Pocket Handbook
Sorry. We’re having trouble copying to your clipboard.
Try directly copying the link below.
Brush Studio Settings
Explore the eleven adjustable attributes of Procreate brushes. Discover the variety of settings and fine control each one offers.
Naming your brush
Give your brush a creative name.
Tapping New brush in Brushes creates a brand new brush titled Untitled Brush and opens Brush Studio Settings.
To title your brush, tap on Untitled Brush to invoke the iOS keyboard and rename.
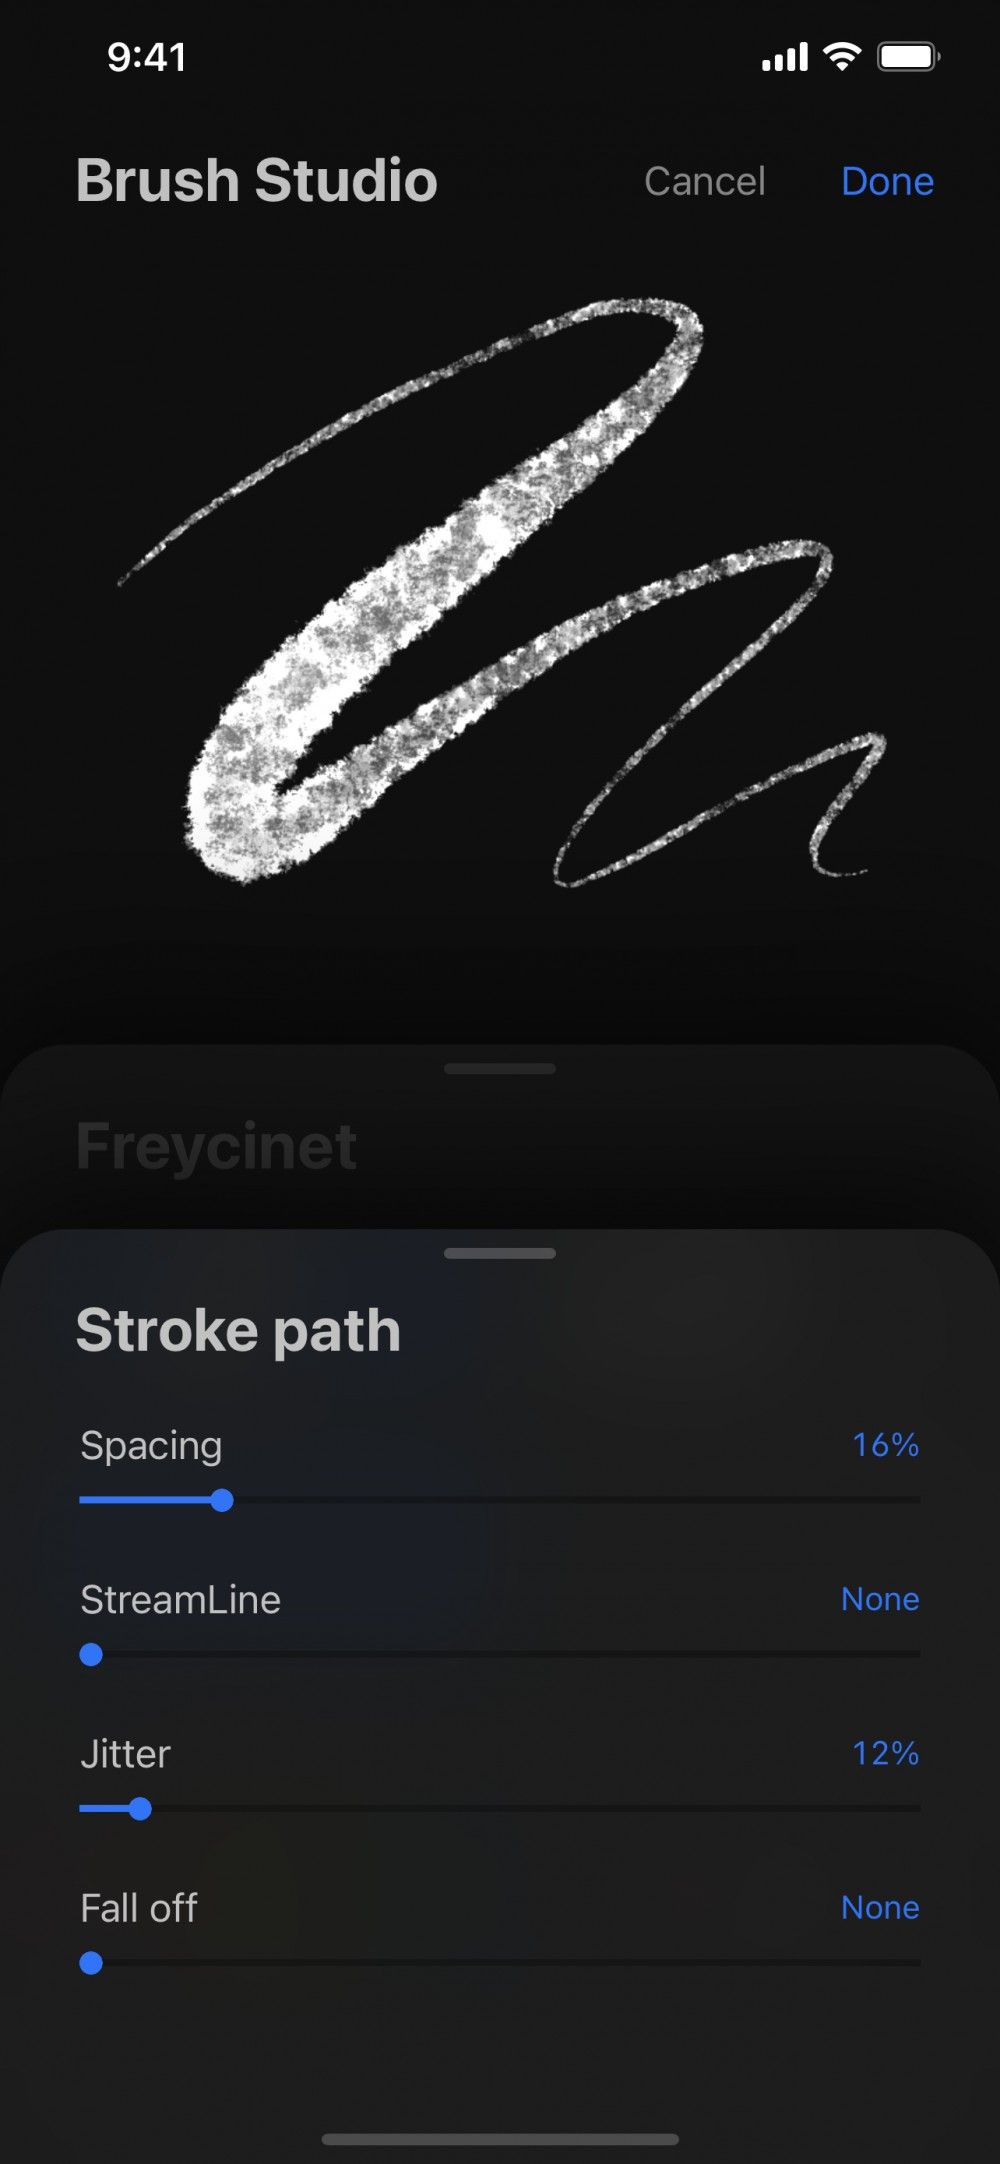
Attribute: Stroke Path
Procreate Pocket creates a stroke by plotting many points along the path your finger creates as it moves across the screen.
Stroke Properties
Adjust the behavior of your stroke by changing spacing, smoothing, jitter, and how quickly a stroke fades away.
Spacing
Sets how many times your brush shape ‘stamps’ itself along the path. When you add a lot of space, you will begin to see the brush as a series of shapes along the path with gaps between them. If you reduce down to no space, the brush shapes along the path will merge into one single fluid stroke.
StreamLine
Assists in smoothing out any wobbles or shakes in your line. StreamLine is particularly important for inking and calligraphy. Turn it up for a smooth and even result, and turn it down or off for more less smooth and natural linework.
Jitter
Takes each ‘stamp’ of your brush shape along the path and offsets it by a random amount. Turn it off to keep all stamps completely aligned for a smooth stroke. Turn it up a little to roughen the edge of your brush. Turn it up a lot to scatter your shapes around your central path.
Fall Off
Start your stroke at full opacity and then fade it away as it goes on. Turn it off for zero fade. Turn it right up to rapidly fade a stroke to invisibility.
Attribute: Taper
Adjust how your brush changes thickness and opacity at the beginnings and ends of your strokes for a natural, tapered appearance.
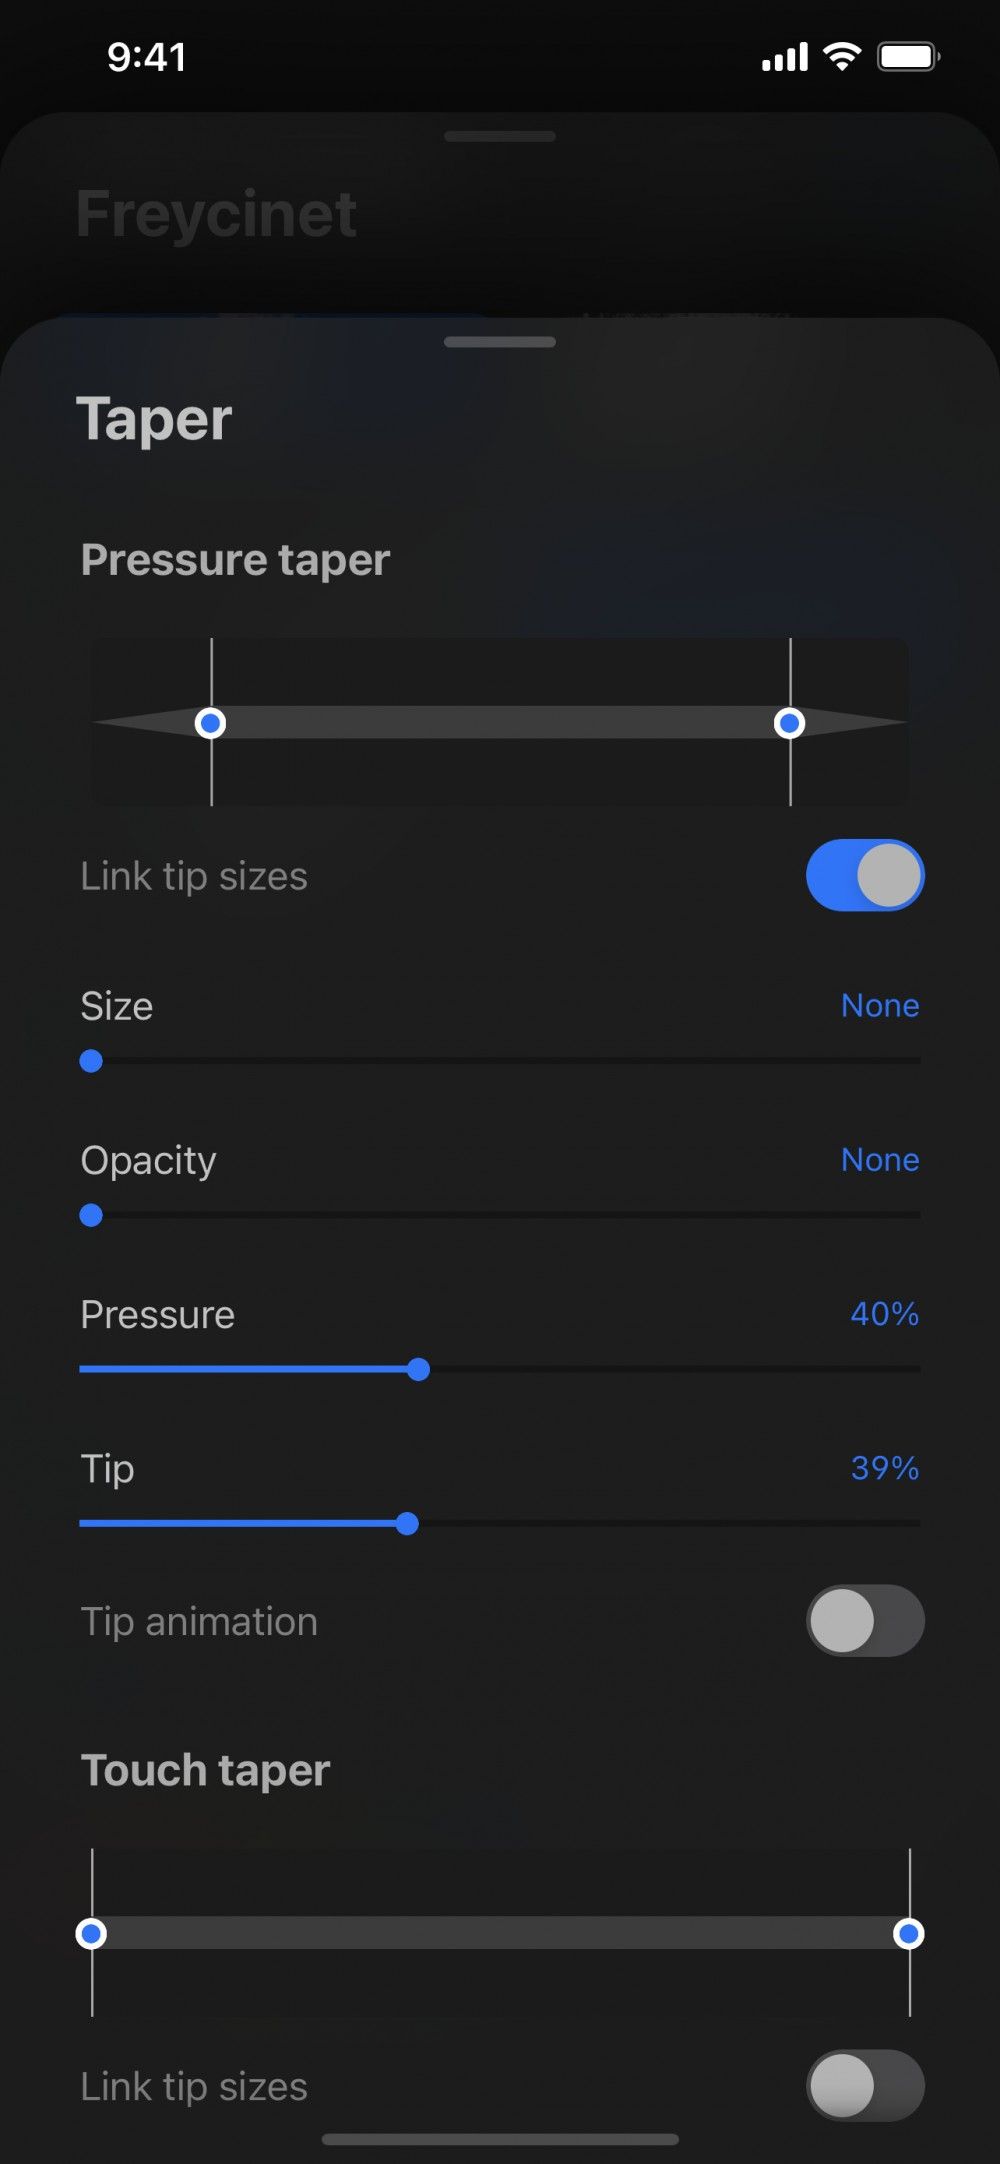
Pressure Taper
Extend the taper at the beginning and end of a brush stroke.
You can lengthen the existing tapers at the beginning and/or end of your strokes artificially for a more elegant line using Pressure Taper.
Pressure Taper Slider
This slider gives you a visual representation of how much artificial taper is at the beginning and end of your stroke depending on what the Pressure slider is set to. Move the sliders towards the middle of the stroke to adjust taper length. You can set taper at the beginning of the stroke, the end of the stroke, or both.
Link Tip Sizes
Switch this on to match the Pressure Taper adjustment when moving either of the sliders.
Size
Set how severely your taper transitions from thick to thin.
Opacity
Sets the amount of transparency your taper fade to at its ends.
Pressure
Use the Pressure slider for a more responsive natural taper that thins out faster at the end of a stroke.
Tip
On low settings, this makes your stroke taper behave as though you are using a brush with a very fine tip. On high settings, your taper responds as though drawn with a brush that has a chunky, thick tip.
Tip Animation
Toggle this switch on to see the effect Procreate Pocket applies to the taper of your stroke. Toggle it off to hide the animation depending on your preference.
Pro Tip
Pressure Taper is only active on phones that have 3D Touch or when using a third party Stylus with pressure sensitivity.
Touch Taper
Add taper to the beginning and end of brush strokes drawn with a finger.
When you paint with your finger in Procreate Pocket, pressure settings in brushes cannot be used, so it’s impossible to achieve taper using pressure.
However, you can artificially add tapers to the beginning and end of your strokes using Touch Taper.
Touch Taper Slider
A visual representation of how much artificial taper is at the beginning and end of your stroke. Pull the sliders towards the middle of the stroke to adjust taper length. You can set taper at the beginning of the stroke, the end of the stroke, or both.
Link Tip Sizes
When this is switched on, adjusting one side of the Touch Taper slider will automatically adjust the other side to match.
Size
Set how severely your taper transitions from thick to thin.
Opacity
Fade your taper to transparency at the ends.
Tip
On low settings, this makes your stroke taper behave as though you are using a brush with an extremely fine tip. On high settings, your taped responds as though drawn with a brush that has a chunky, thick tip.
Taper Properties
Set the Taper function back to the type used in older versions of Procreate Pocket.
Classic Taper
The way Procreate Pocket renders a taper has been updated since older versions. This toggle returns the taper behavior and appearance to the older version.
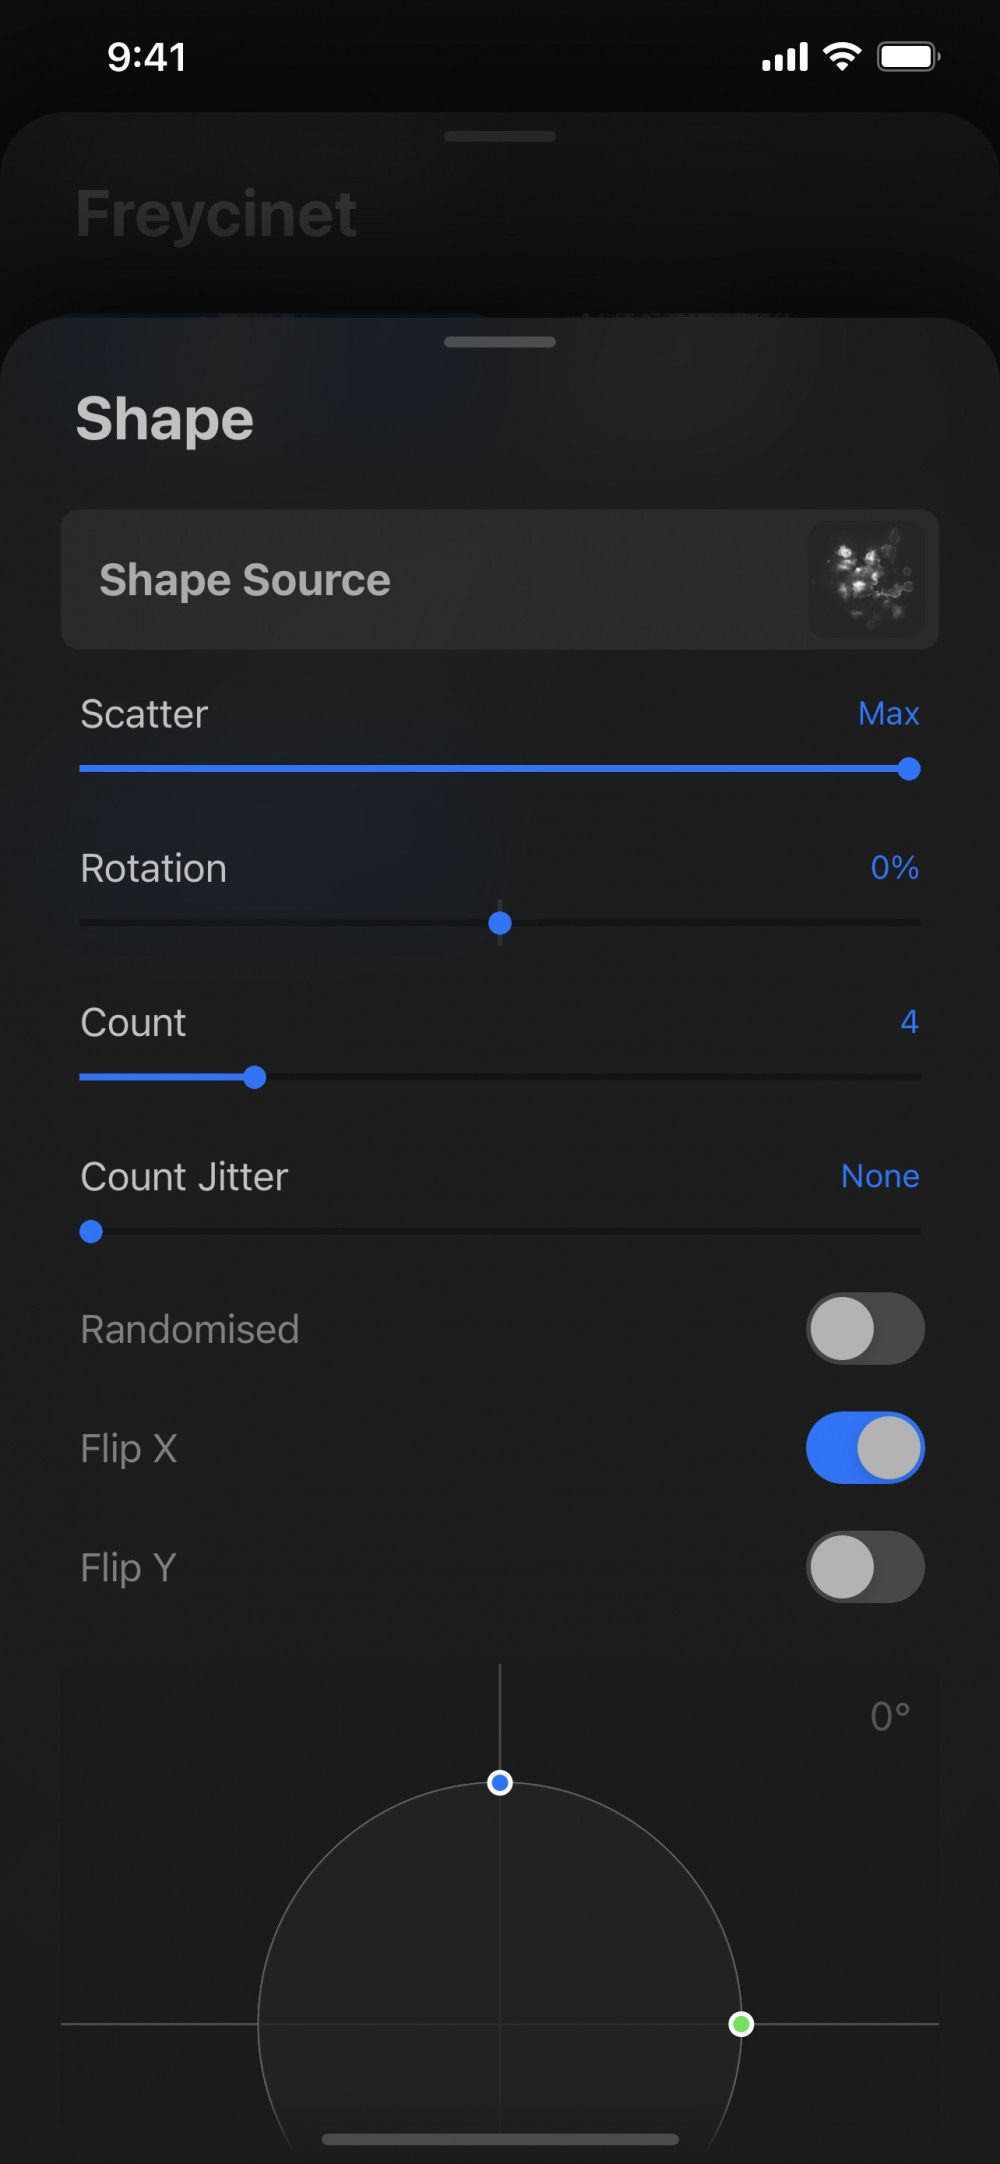
Attribute: Shape
Change the shape of a brush tip by importing an image into the Shape Source. Adjust the scatter, rotation, frequency, width, and other properties of this shape.
Procreate Pocket makes brushes with a shape (container) that holds a grain (texture).
You can see the shape of any brush when you tap your finger on the canvas. By doing this, you create a stamp instead of making a stroke.
Dragging this shape creates a stroke. A smooth circular shape will create a smooth even stroke. An irregular patchy shape creates a rougher stroke. This stroke changes thickness and texture when you drag the shape in different directions.
Adjust the shapes in existing Procreate brushes, or load your own shapes. You can do this by loading images with the Shape Source tool to create completely unique brushes.
Shape Source
Import your own images to use as the basis of brush shapes with this powerful tool.
Tap the Shape image icon to the right of Shape Source to open the Shape Editor.
Shape Editor
Tap Import to import a new shape from a photo or file. You may also paste in copied images, or access Procreate Pocket’s Source Library's default pre-made shapes.
Source Library
The Source Library offers you over 150 unique shapes to use as the basis of your brushes. Access all these shapes from the Shape Editor. Scroll through the collection to browse a shape you want to use. Or use the Search box to search for a particular types of shape's name. For example, searching "gouache" will find all the shapes based on gouache paint marks.
Tap Done to close the Shape Editor and begin adjusting the behavior of your shape once you’ve imported or chosen your shape.
Shape Behavior
Change the behavior of the brush shape for each stamp within the stroke.
A stroke forms by ‘stamping’ the brush shape over and over again along a path. There are many different ways the same shape can stamp when making a stroke. A shape can rotate, randomize or stamp more than once at each point.
Pro Tip
To see these settings in action, it can be useful to go into Stroke Path and push the Spacing slider up. This lets you see the shapes as individual stamps rather than blurred together into a stroke. Even after you’ve set the spacing back to normal, this will help you visualize what each setting does.
Scatter
By default, your shape will ‘stamp’ in the same direction without rotating. Use Scatter to randomize its rotation each time it stamps. Scatter is not affected by stroke direction.
Rotation
Adjust the rotation of your shape in relation to the direction of your stroke. When set in the middle to 0%, shape direction remains static no matter which way your stroke travels. Set to the far right of the slider at 100%, your shape will rotate to follow the rotation of your stroke. Set to the far left of the slider at -100%, your stroke will rotate in the inverse direction to your stroke.
Count
Set the shape to stamp more than once at each point, creating up to 16 stamps each time. You can see the effect of this best when used in combination with Scatter. As each of the multiple stamps on a given point will rotate in a different direction at random.
Count Jitter
Vary the number of times the stamp applies at a point. If you have your Count Jitter set to 5, you will get between 1 to 5 random instances of the stamp at each point.
Randomized
Randomize the rotation of your shape when your stroke begins. This has the effect of making each stroke different from the one before it to creating a more organic feel.
Flip X / Flip Y
Flip your shape horizontally or vertically to create different and more organic effects.
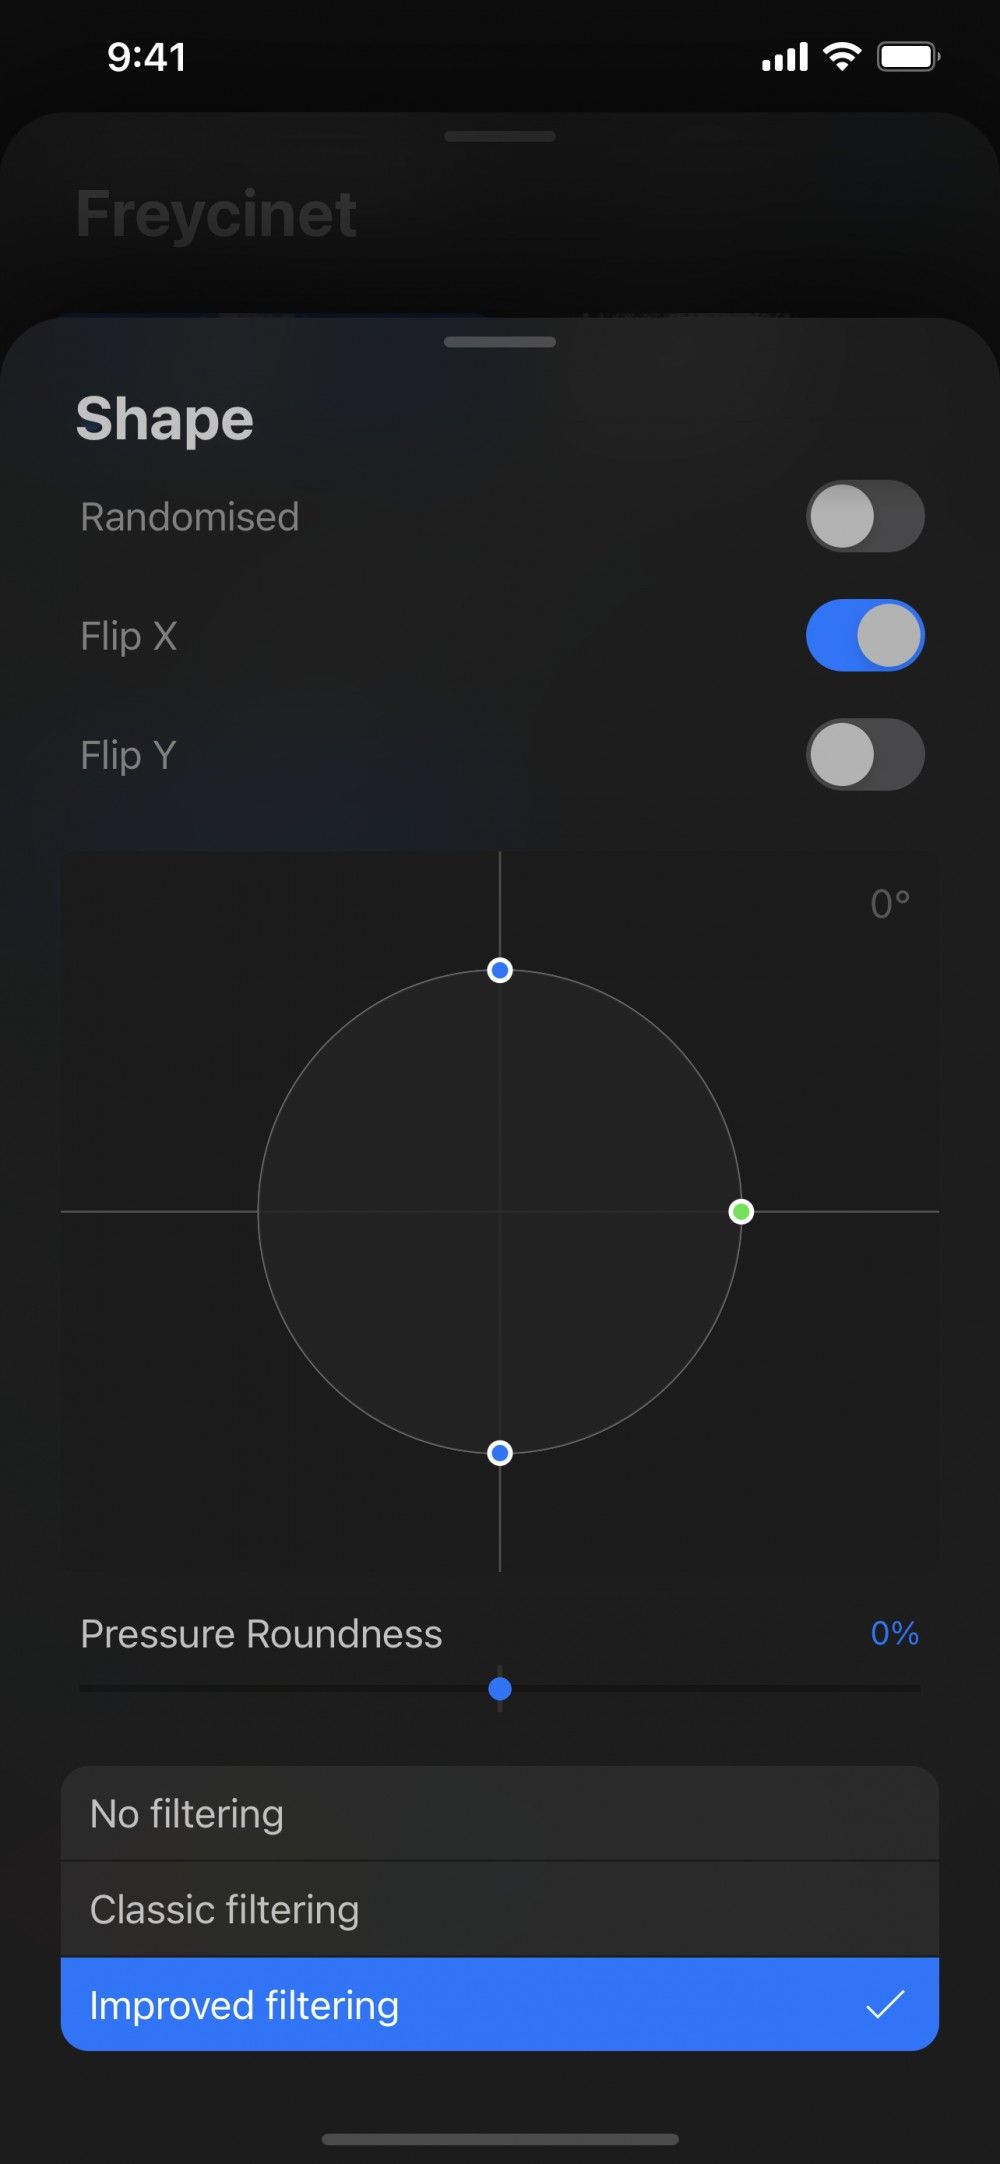
Brush Roundness Graph
Drag the green node around the edge of the circle to change the base rotation of your shape. Drag the blue nodes to squash your shape.
Pressure Roundness
Squash your shape based on how much pressure you apply using the Pressure slider.
Shape Filtering
Shape filtering adjusts ‘antialiasing’. Antialiasing is how the graphics engine handles shape edges.
No Filtering
Doesn't soften the edges at all. This may result in a jagged look, but preserves every detail of the core brush shape.
Classic Filtering
Softens the edges of your shape using the settings from earlier versions of Procreate Pocket.
Improved Filtering
Provides improved and updated antialiasing used in more recent versions of Procreate Pocket.
Attribute: Grain
Create a new grain from any image with the powerful Grain Editor. Adjust whether the grain stays still behind your stroke or moves along with it. Also tweak scale, depth, blend mode and more.
Grain is the texture that sits inside your brush shape. While the shape acts as a container for the grain, the grain acts like a paint roller. When you paint a stroke, the grain is ‘rolled’ inside the shape and onto your canvas.
Grain Source
Import your choice of images to use as textures for the grain of your brushes.
Tap the Grain image icon to the right of Grain Source to open the Grain Editor and access the Source Library. This lets you import and edit images to turn them into tiling textures for your brushes. See below for more information.
Grain Behavior
Change the behavior of the grain inside your brush shape.
Moving
Set your grain to move with the stroke for a more streaky and blurred effect. Using the metaphor of grain being a paint roller, when set to Moving the roller is locked in place. This means the grain drags the texture around, rather than rolling it onto the canvas.
Moving and its various adjustment options create brush-like applications with grain. These behave more like traditional paint on canvas.
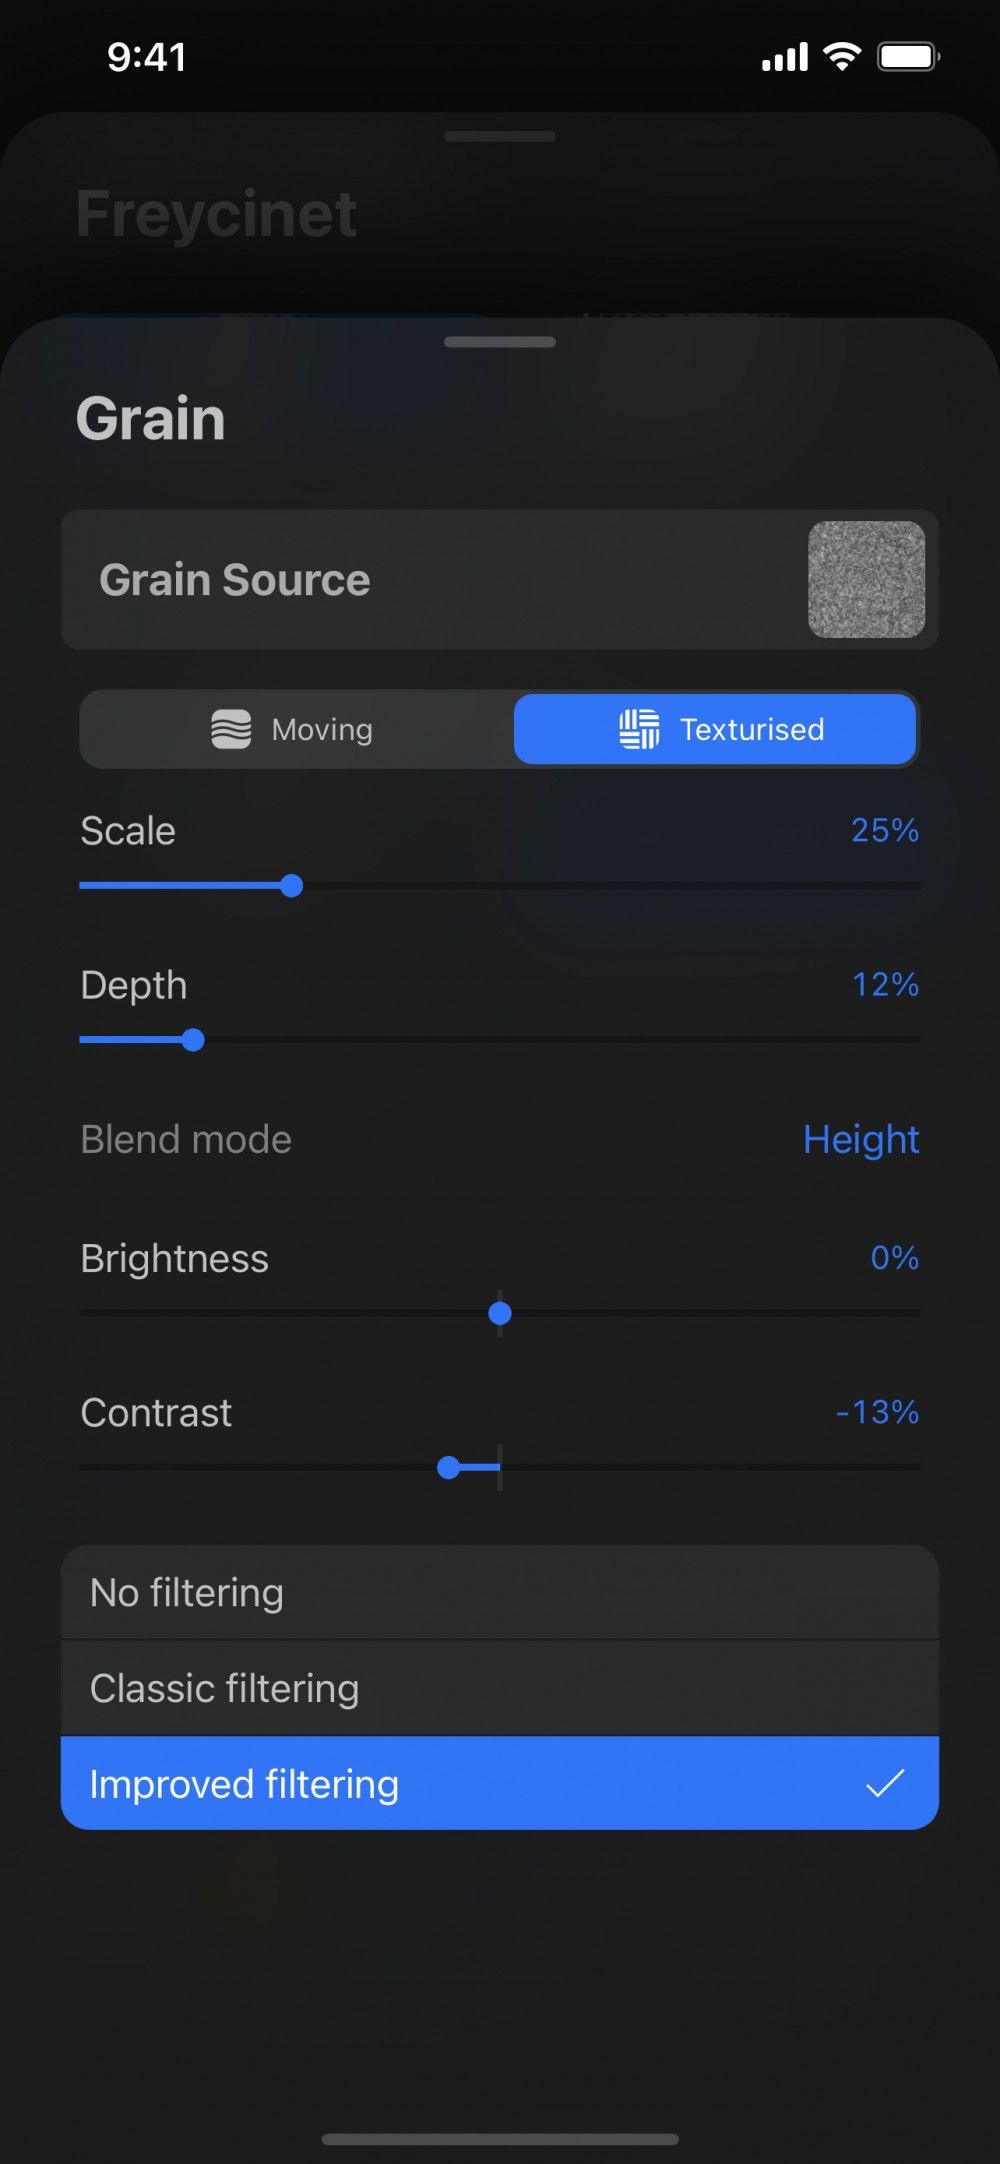
Texturized
Set your grain to stay as a static texture ‘behind’ your brush stroke for a crisp and clear effect. Using the metaphor of grain being a paint roller, when set to Texturized the roller is unlocked. This creates a continuous ‘stamp’ of the texture with no dragging or smearing.
Texturized and its various adjustment options create consistent textures with grain. These paint the grain's texture onto the canvas like a stencil more than a traditional brush.
Movement
Set the slider low for a more drag. This gives a smeared effect, and high for a roller effect much like the Texturized setting.
Scale
Adjust the size of the grain texture inside the shape.
Zoom
Setting the slider all way to the right, to Cropped keeps the texture size fixed, no matter how large or small you make your brush while painting. Setting the slider all way to the left, to Follow Size means the grain will scale along with your brush size. This setting is only available when grain is set to Moving.
Rotation
This will smear the grain image based on directional stroke changes. This creates a similar effect to Moving. 100% inverse makes the grain rotate the opposite way to the stroke direction. At 0% it locks the grain rotation in place. And Follow Stroke makes the grain rotate to follow your stroke direction. This setting is only available when grain is set to Moving.
Depth
Adjust the strength of the texture established over the base color of the brush. Set at minimum, the texture won’t show at all. Set at maximum, the texture will be dark and vivid. When the grain is set to Moving, the pressure of a stroke affects how strong the contrast shows.
Depth Minimum
Sets the minimum level of contrast in a texture, beyond which the brush can no longer go. This setting is only available when grain is set to Moving.
Depth Jitter
Swing between the texture and the underlying color of your stroke at random. This setting is only available when grain is set to Moving.
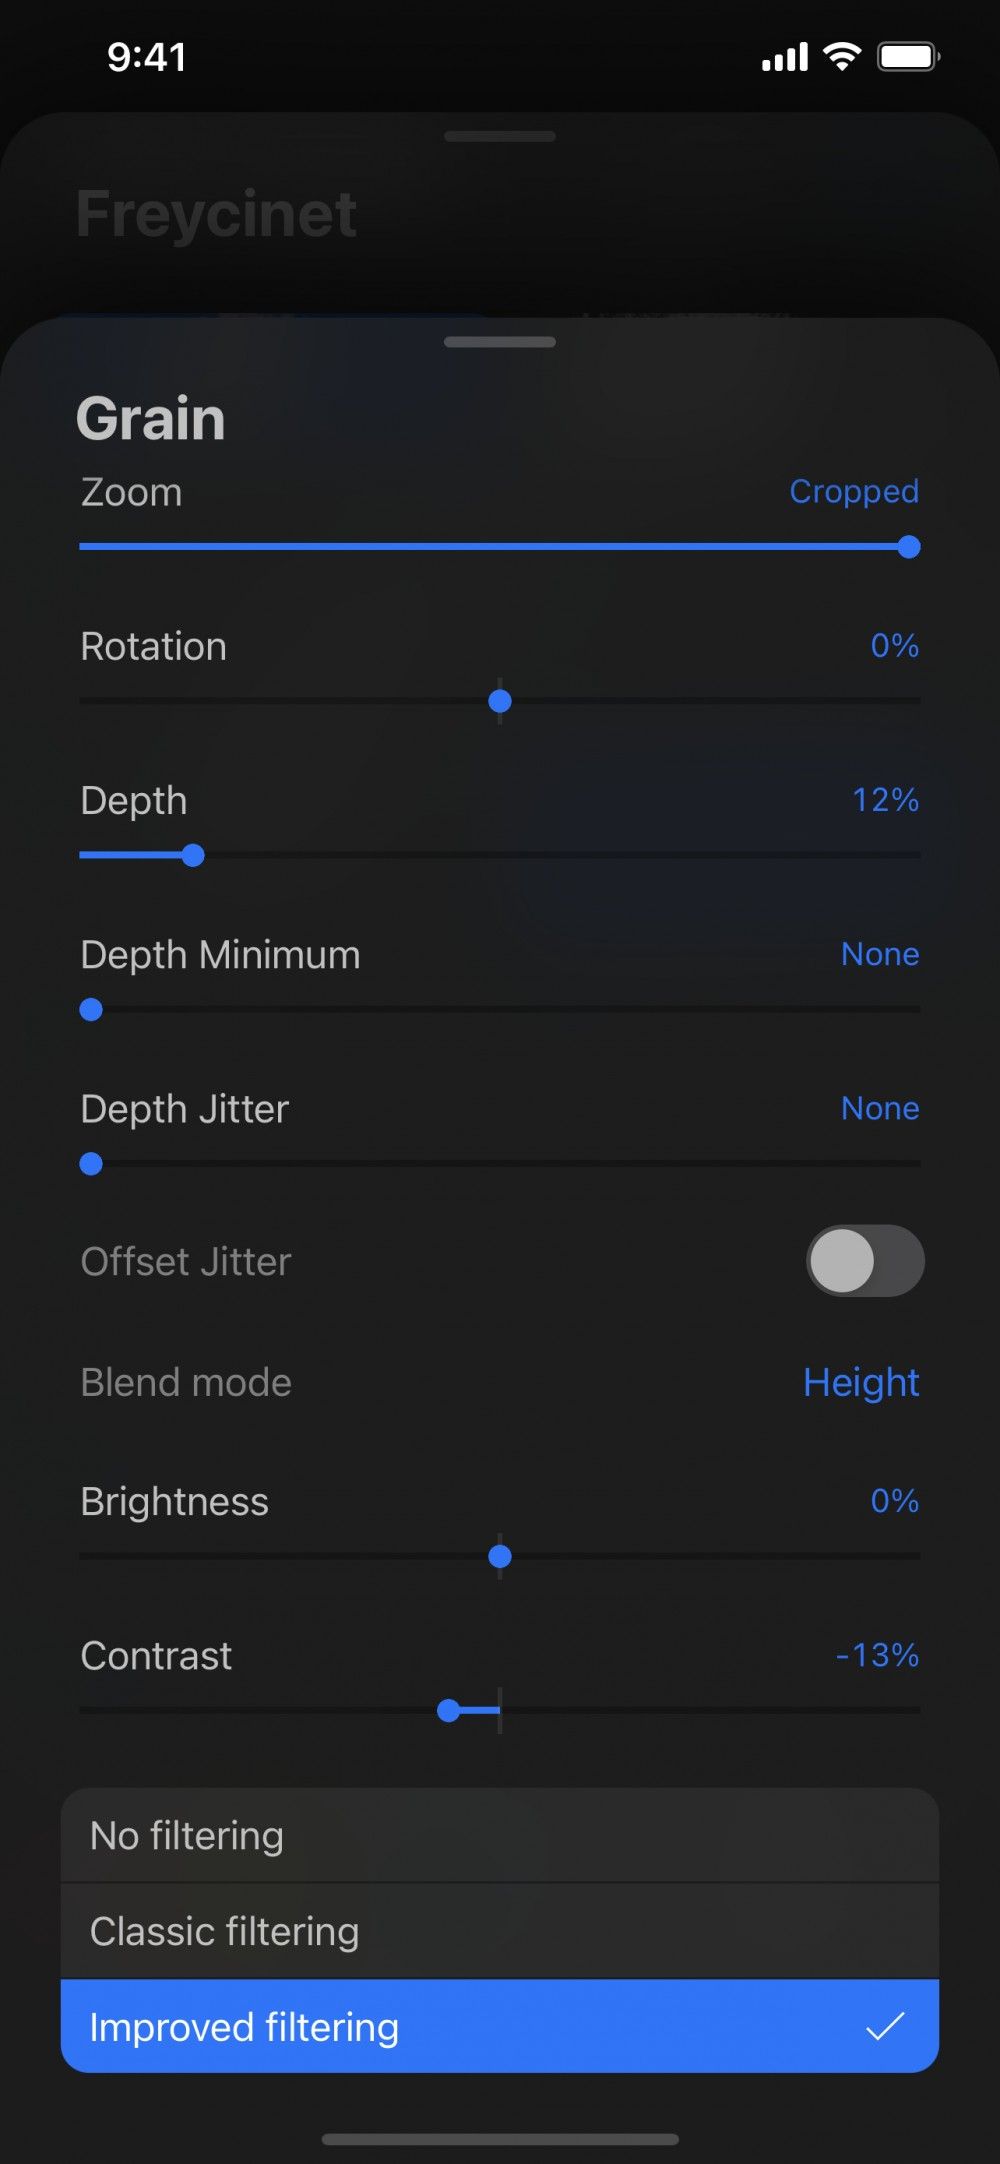
Offset Jitter
Offset where your texture places down each time you make a new brushstroke to create a more organic effect. With brushes designed to lay down a pattern, like the Grid brush, turn off Offset Jitter to keep the pattern consistent. This setting is only available when grain is set to Moving.
Blend Mode
Control how the grain texture blends with the underlying color of the brush using Blend Mode. This works both on Moving and Texturized brushes.
Brightness / Contrast
This makes the grain lighter or darker. It also increases or decreases the difference between the light and dark areas.
Grain Filtering
Grain filtering adjusts ‘antialiasing’. Antialiasing is how the graphics engine handles grain.
No Filtering
Does not soften the edges at all. This may result in a jagged look, but preserves every detail of the grain.
Classic Filtering
Softens the edges of your grain using the settings from earlier versions of Procreate Pocket.
Improved Filtering
Provides improved and updated antialiasing used in more recent versions of Procreate Pocket.
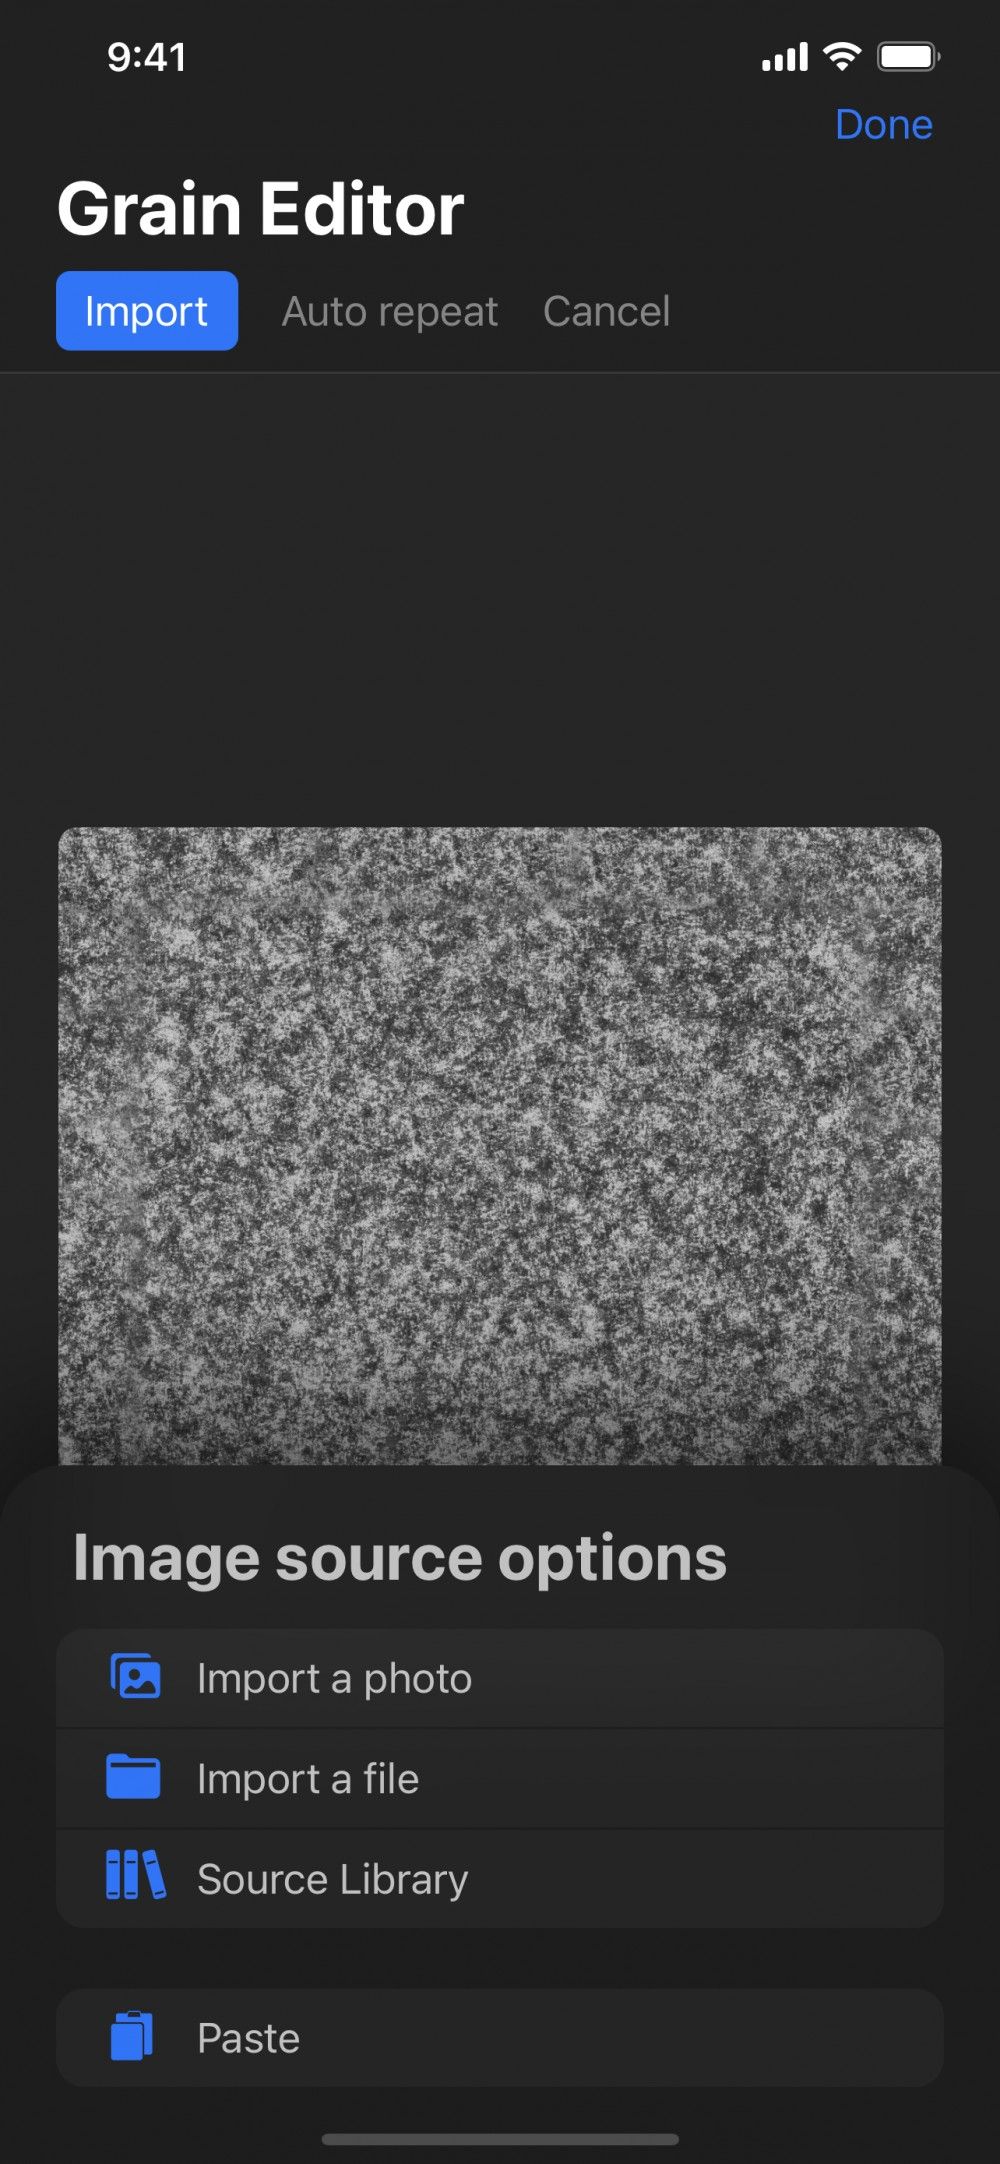
Grain Editor
Import new textures from photos or files. You may also paste in copied images, or access the Procreate Pocket Source Library's default pre-made textures.
Pro Tip
Create unique new brushes by using your iPhone to photograph environmental textures. Stone, wood, cloth, and marks made with ink and paint make interesting bases for custom brushes.
Import
The Import menu offers four ways to import images to use as the basis for new brush textures.
Import a Photo
Select a photo from the iOS Photos app, including photos you've taken yourself.
Import a File
Select a photo from the iOS Files app.
Source Library
Select from Procreate Pocket's inbuilt range of pre-made textures. See below for more detail on the Source Library.
Paste
Paste a copied image from your clipboard.
Auto Repeat
Turn a snapshot of a texture into a seamless tile using Auto Repeat.
Grain Scale
Adjust the size of the texture within each tile.
Rotate
Adjust the angle of the texture within each tile.
Border Overlap
Change how much the borders between tiles overlap.
Mask Hardness
Adjust the amount of blurring used to blend the tiles together.
Mirror Overlap
Flip the pattern at the edge of each tile so it lines up with the surrounding tiles to help conceal tile edges.
Pyramid Blending
This new form of blending stitches together complex patterns with differing levels of detail to help create a seamless grain.
Auto Repeat previews all changes live.
Pro Tip
Pyramid blending is ideal for irregular natural textures like wood and stone. The simpler edge blending modes above work best for more high-contrast regular patterns.
Return to Brush Studio
Cancel
To exit without applying any changes, tap Cancel.
Done
Tap Done to close the Grain Editor and begin adjusting the behavior of the grain you created.
Pro Tip
Two-finger tap on your texture to invert the grayscale tones in your image. Dark areas become light, and light areas become dark. Two-finger tap again to reverse this effect.
Source Library
Access the Source Library from the Grain Editor. The Source Library offers you over 100 unique textures to use as the basis of your brushes.
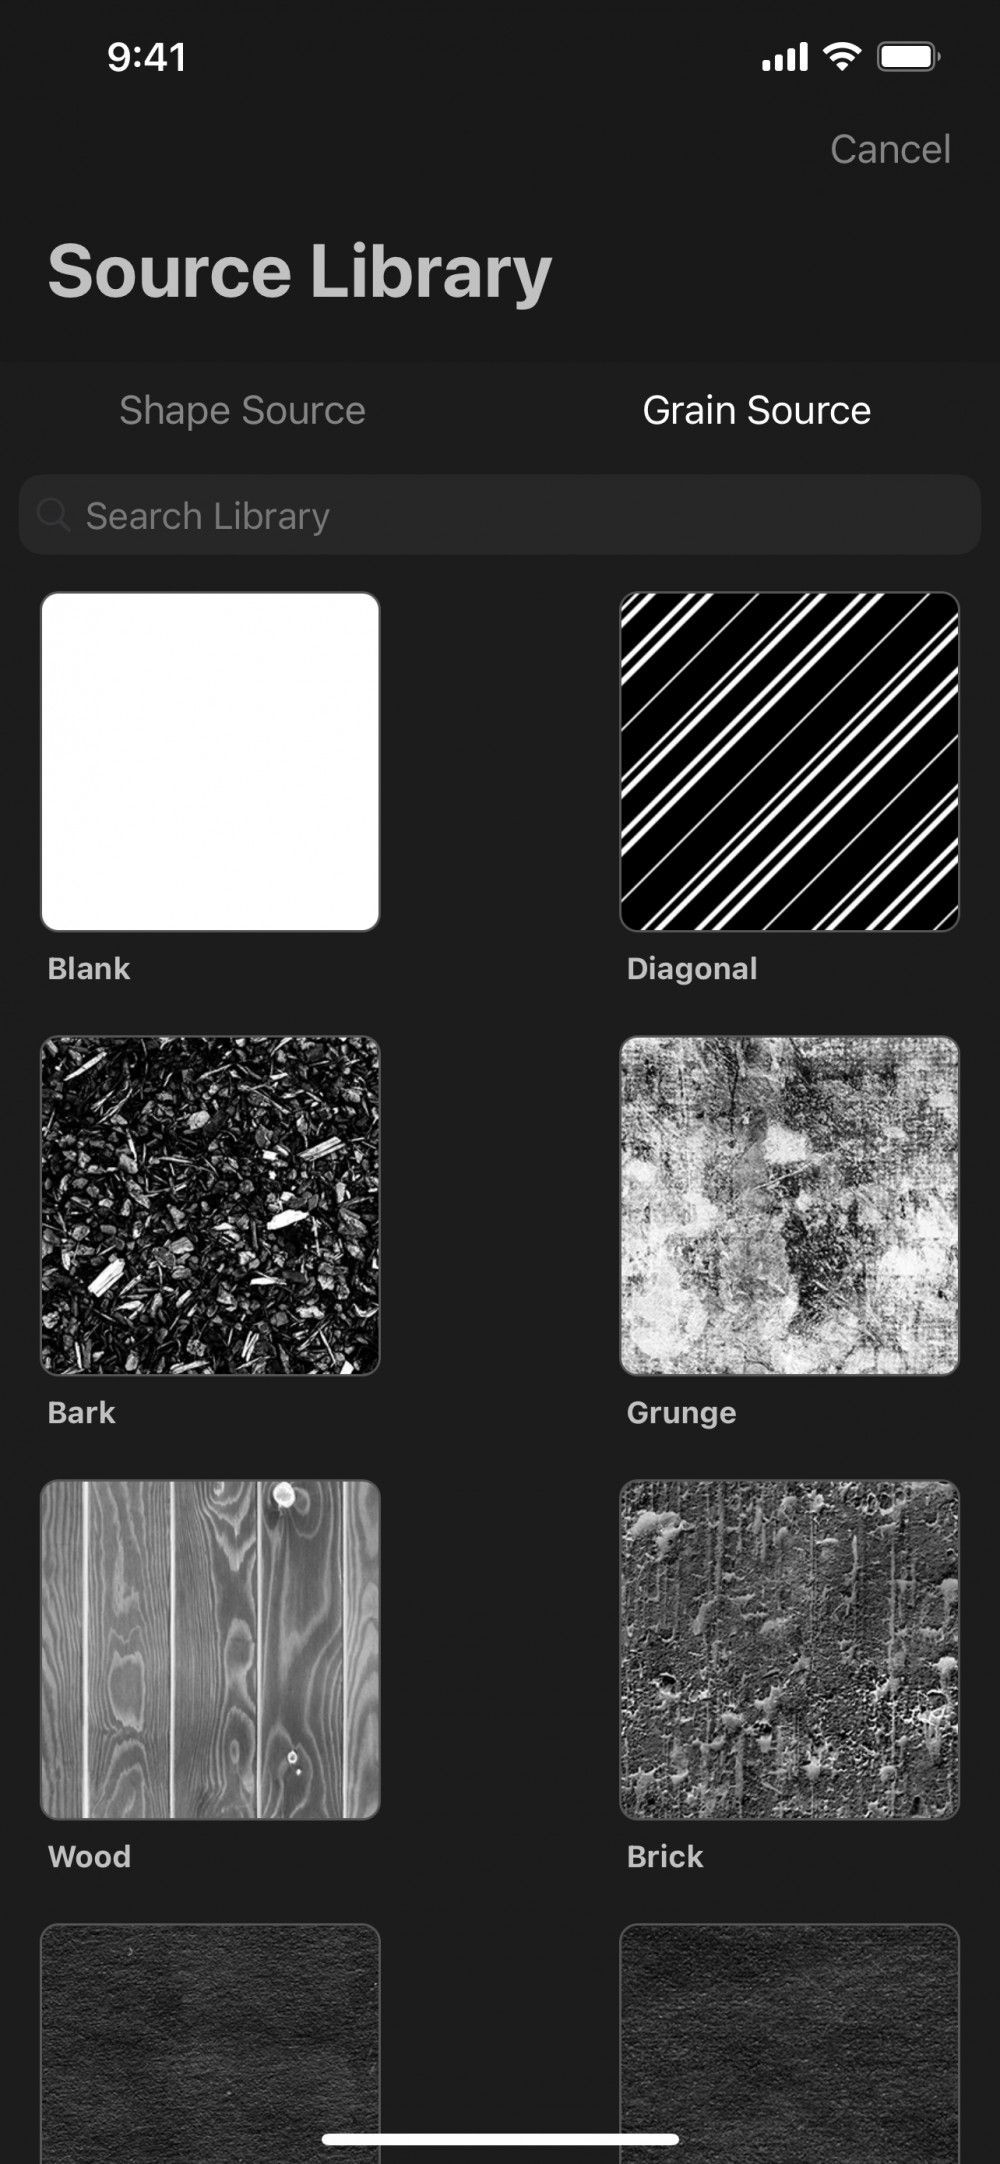
From the Grain section of the Brush Studio, tap Grain Source > Import > Source Library. Tap a texture to exit back to the Grain Editor and being making adjustments.
Shape Source
Use the Shape Source library to select a shape as a base for your brush.
Grain Source
Procreate Pocket's library of pre-made textures opens by default when you enter the Source Library. You can access this from the Grain Source interface. The Source Library offers over 100 searchable textures ideal for brush creation.
Pro Tip
Even though they aren't custom made for the purpose, you can use the Shape Source for creating grain textures. You can also use the Source Library textures as a base for brush shapes.
Search Library
Search the grain names for particular types of texture. For example, searching "Paper" will find all the textures based on paper.
Cancel
To exit without selecting a texture, tap Cancel.
Attribute: Rendering
Procreate Pocket offers many ways to render the brush to the screen. Go under the hood to adjust render modes. Change the way strokes and colors behave on your brush and when interacting with the canvas.
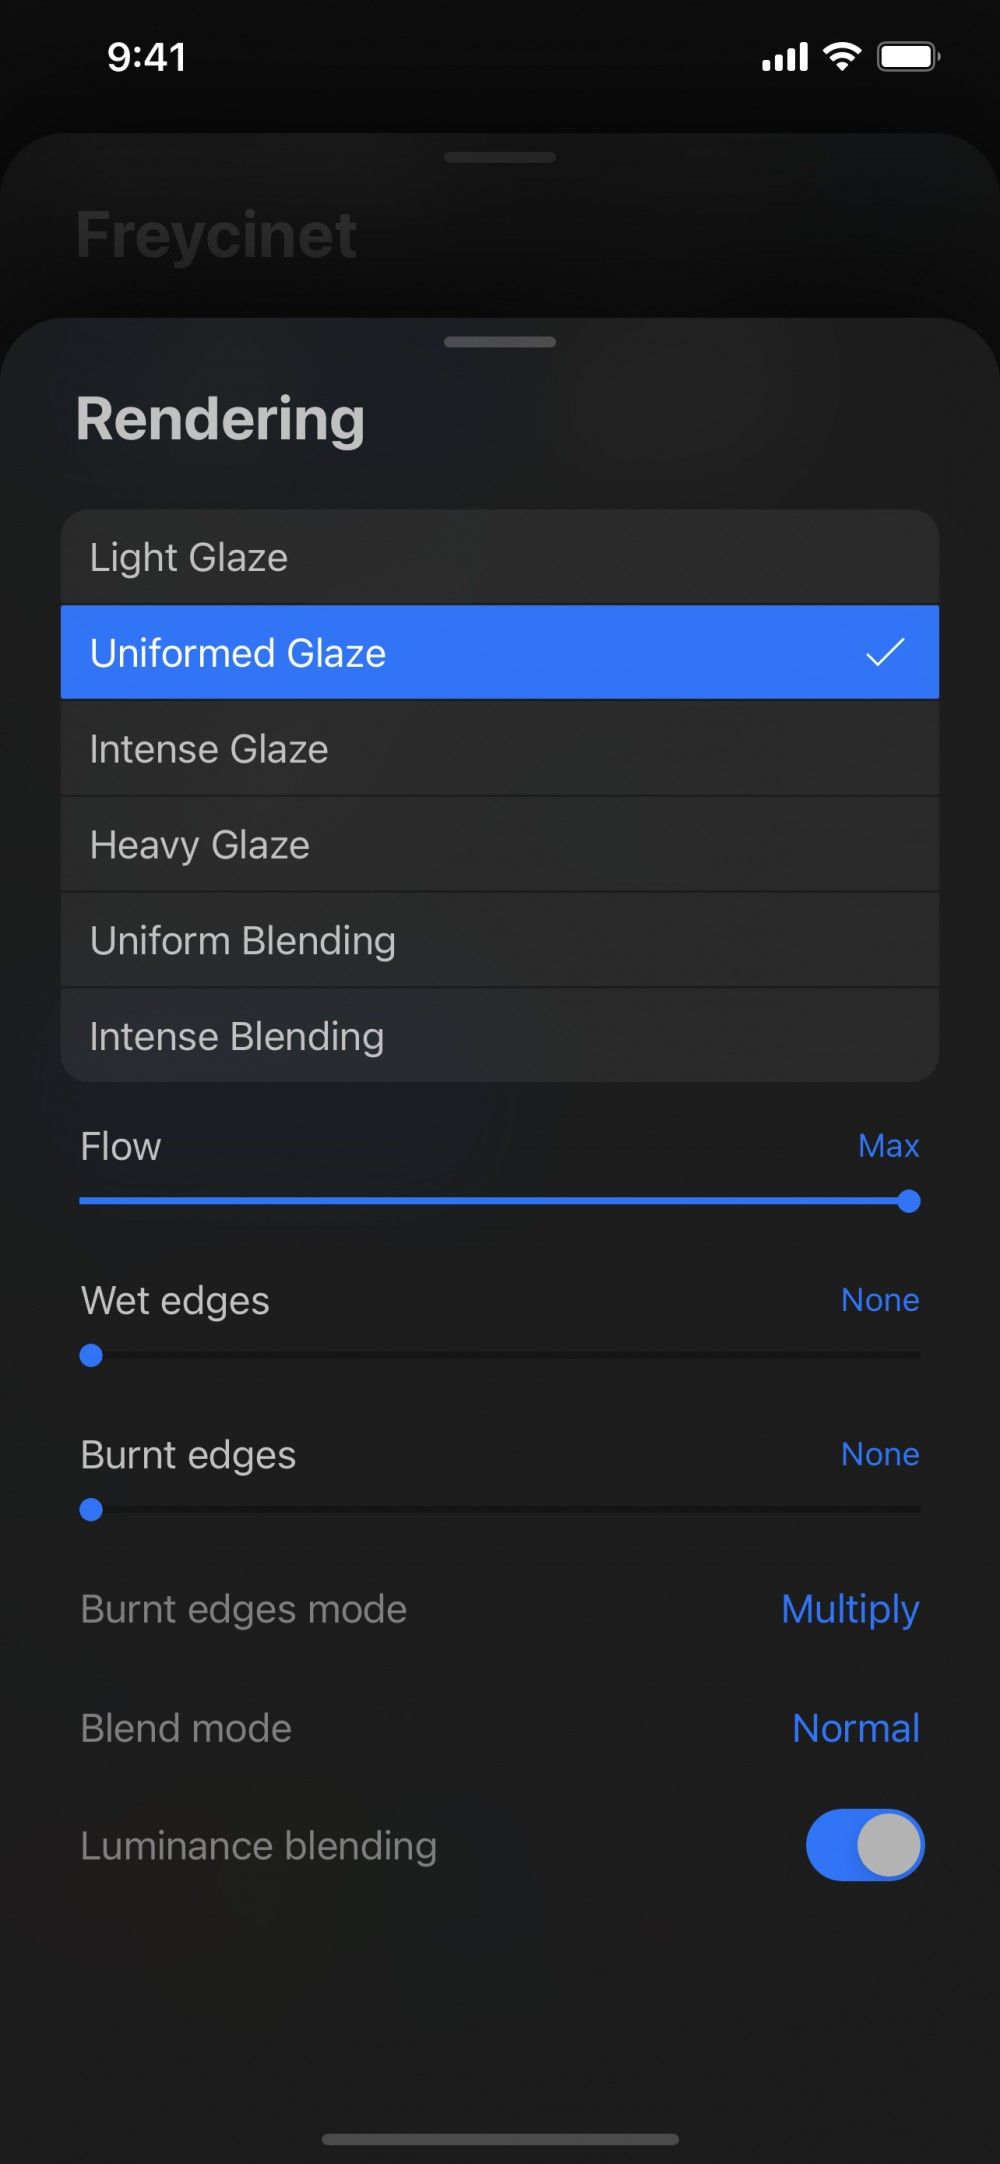
Rendering Mode
Procreate Pocket gives you full control over how it renders your brush strokes. It also lets you control how brushstrokes interact with one another.
These effects are best understood by imagining physical paint on canvas. On the light-rendering end of the spectrum, Light Glaze is like laying down diluted paints. On the heavy-rendering end, Intense Blending is more like laying thick paint onto the canvas.
Light Glaze
This is Procreate Pocket’s standard rendering mode.
Uniformed Glaze
This rendering mode is similar to the rendering used in Adobe® Photoshop®.
Intense Glaze
This mode renders colors onto the screen with a heavier touch.
Heavy Glaze
This is the strongest rendering mode.
Uniform Blending
Combines the Adobe® Photoshop® rendering style with a caustic approach to rendering color. This exaggerates the Wet Mix effect.
Intense Blending
Intense Blending is great for wet brushes that squash and mix colors together. The heaviest mode offered and exaggerates the Wet Mix effect.
Blending
Select from a variety of options to adjust the way your strokes interact. Control how pigment dilutes and how colors mix into each other. Adjust the flow of your brush, and create the effect of wet edges, burnt edges and more.
Flow
Adjust how much color and texture flows from your brush onto the canvas.
Wet Edges
Soften and blur the edges of your brushstrokes to mimic pigment bleeding into paper.
Burnt Edges
This creates a ‘color burn’ effect around the edges of the stroke when you layer brushstrokes. Burnt Edges also darkens the edges where colors overlap.
Burnt Edges Mode
Set the Blend Mode for the above effect. This enables you to create a variety of interesting layering effects that apply only to the edges of your brush.
Blend Mode
Set the Blend Mode for the entire brushstroke, not only the brushstroke edges.
Luminance Blending
Blend modes usually affect the color values of a brushstroke. Flip this toggle to blend the lightness values instead.
Attribute: Wet Mix
Tweak how your brush interacts with color, and how the color you lay down interacts with the canvas.

Dilute the pigment on your brush. Start out with a lot of paint on the brush or only a little. Make your pigment bleed into other colors or pull them around.
Fine adjustments to the interplay of Dilution, Attack, and Charge can layer on top of other settings. This helps create brushes with very realistic behaviors.
Dilution
Set how much water mixes in with the paint on your brush. Increase Dilution to give your paint a transparent effect.
Charge
Set how much paint is applied onto your brush when you begin to make a stroke.
Like a real paintbrush, the longer you drag your stroke out, the more paint it will leave behind on the canvas. As the brush runs out of paint, the trail of color it leaves will become less intense.
Recharge the brush by ending a stroke and lifting it from the canvas. When you put it down again, it will be as though you dipped it back into the color on your paint palette. This effect is most obvious in combination with high Dilution.
Attack
Adjust the amount of paint that sticks to the canvas. Set it high for the appearance of thick, bold paint applied evenly along your whole stroke.
Pull
Set the strength of how your brush pulls paint around the canvas. This includes paint that is already laid down. This is a great way to mix and drag colors around for a more organic effect.
Grade
Set the chunkiness and contrast of your brush texture.
Blur
Adjust the amount of blur your brush applies to the paint on your canvas. Also control how much the blur spreads when you apply a brush stroke.
Blur Jitter
Adjusts the randomization of how much blur on each stamp laid down by the brush when you apply a brush stroke.
Wetness Jitter
Randomize how much water mixes in with the paint at any point during the brushstroke. This helps give your stroke a more realistic effect.
Attribute: Color Dynamics
Unlock the full power of digital art. Set your brush to change color, saturation, brightness and more based on the pressure.

Color Dynamics lets your brush shift through different types of color values. These values are hue, saturation, lightness and darkness. You can also choose a secondary color, and shift between primary and secondary colors with each stroke. You can use all these as individual settings, or in combination and control them in a variety of ways.
Stamp Color Jitter
Randomizes how color affects each individual stamp within your brushstroke.
Hue
Each stamp will deviate from your chosen brush color at random. Set the slider low to make these deviations minor. Set the slider high to allow the brush to jitter through a larger spectrum of color. The best way to preview what this setting does is to set the Stroke Path > Spacing slider so you can see individual stamps in your stroke. Also ensure that the Saturation slider below Hue is also set high.
Saturation
Each stamp will deviate from your chosen brush saturation at random. Set the slider low to make these deviations minor. Set the slider high to allow the brush to jitter between zero and full saturation.
Lightness
Each stamp will deviate from your chosen brush lightness by jumping to lighter shades at random.
Darkness
As above, but the opposite: each stamp will deviate from your chosen brush lightness by jumping to darker shades at random.
Secondary Color
Each stamp in your stroke will jitter at random between your currently chosen (Primary) color, and a Secondary color you can set in the Color Panel .
Stroke Color Jitter
Each time you make a stroke, these jitters will change a color attribute of the entire stroke.
Hue
Each individual brushstroke will deviate at random from your chosen color. Set the slider low for minor deviations. Set it all the way up to jitter through the entire color spectrum.
Saturation
Each individual brushstroke will deviate from your chosen color’s saturation at random. Set the slider low for minor deviations. Set it all the way up to jitter from completely desaturated (white, black, or grey) to complete saturation (very bright colors).
Lightness
Each individual brushstroke will deviate at random from your chosen color’s lightness by getting lighter to some degree. Set it low to allow only minor jumps in lightness. Set high to allow it to go to pure white.
Darkness
Each individual brushstroke will deviate at random from your chosen color’s darkness by getting darker to some degree. Set it low to allow only minor jumps in darkness. Set high to allow it to go to pure black.
Secondary Color
Each individual brushstroke will be a random shade of color that falls between your chosen Primary and Secondary colors.
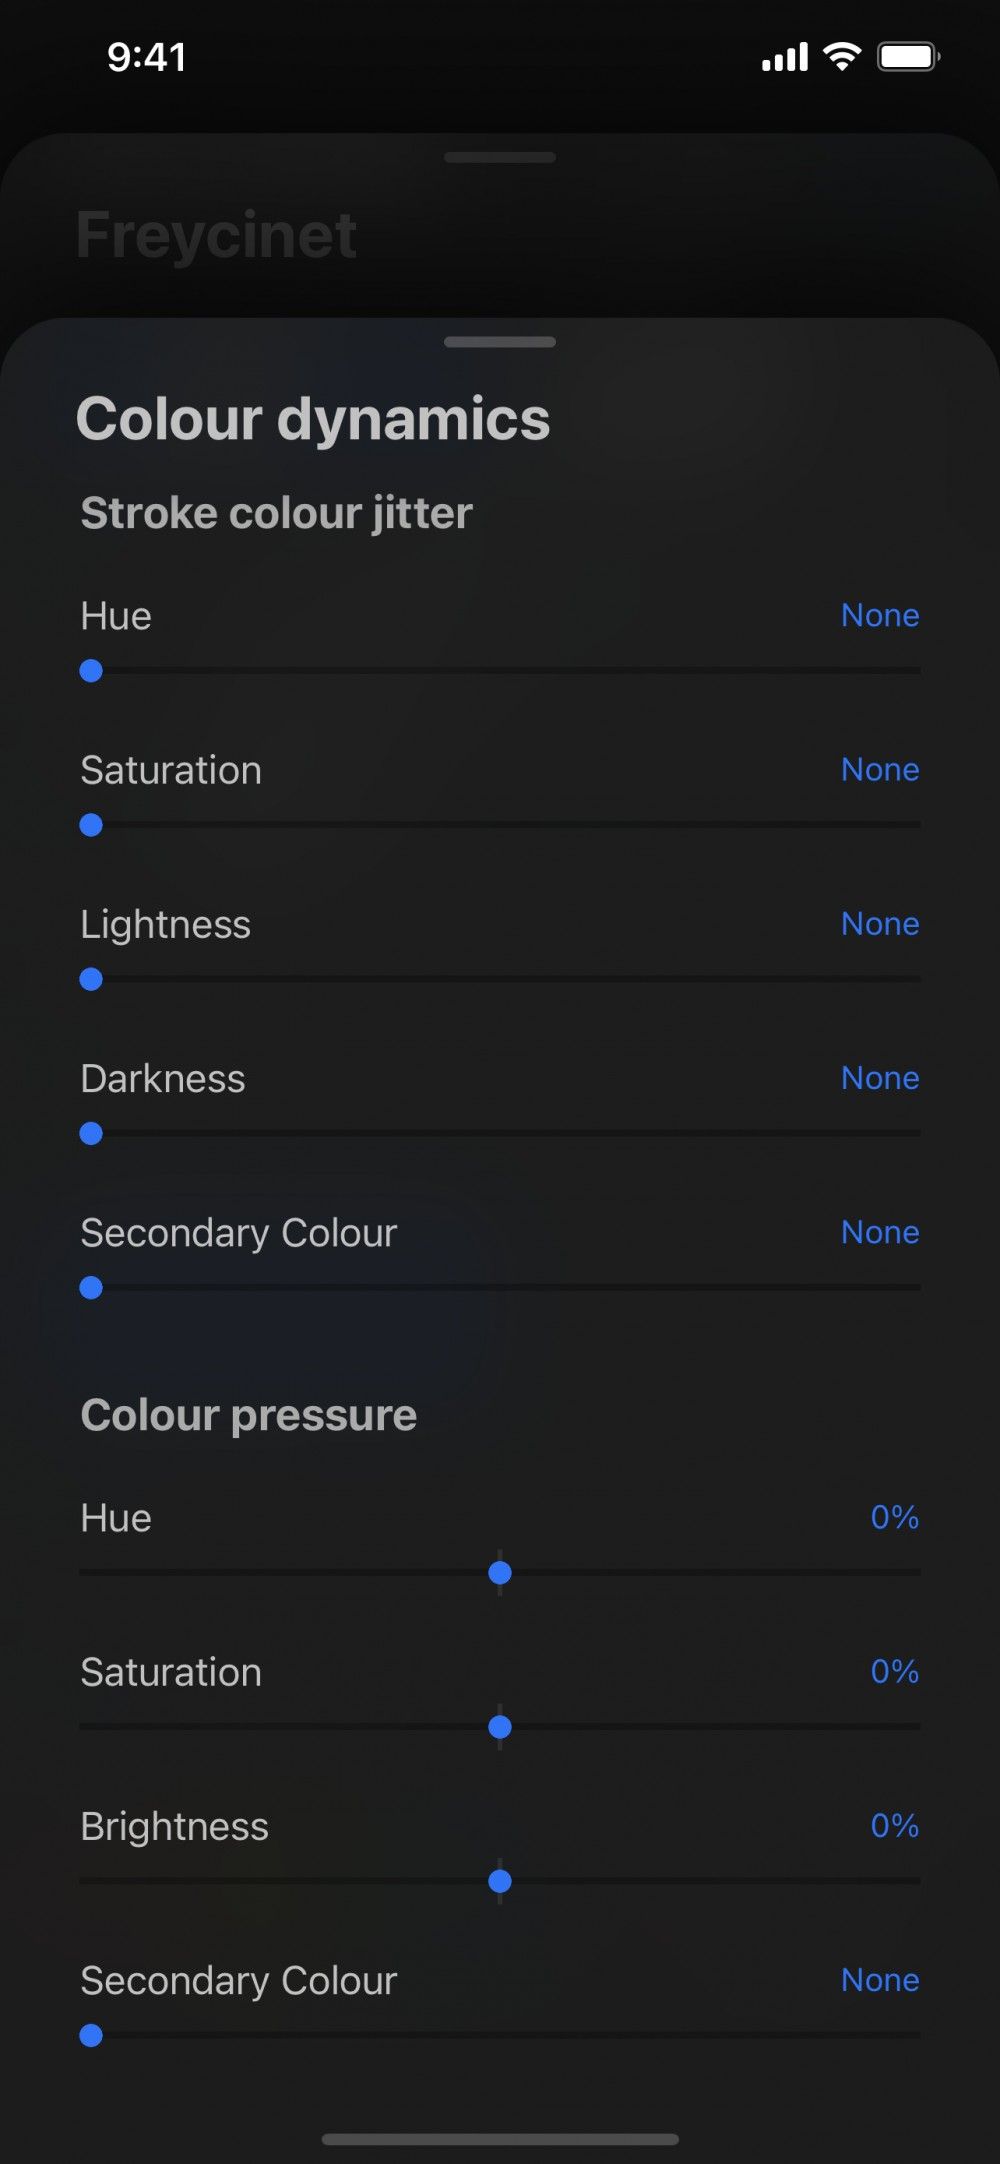
Color Pressure
The pressure applied with your Pressure slider determines what color you will apply to the canvas.
Hue
Pressure changes the color within a stroke. If set at 100% your stroke transitions through the entire color spectrum. This occurs when you transition from light to heavy pressure.
Saturation
Pressure changes the saturation within a stroke. If set at 100% your stroke transitions from white to a completely saturated color. This occurs when you transition from light to heavy pressure.
Brightness
Pressure changes the brightness within a stroke. If set to 100% your stroke transitions from white to black. This occurs when you transition from light to heavy pressure.
Secondary Color
Pressure transitions from the Primary to the Secondary color within a stroke.
Attribute: Dynamics
Set your brush to make dynamic changes based on how fast you make strokes. Add unpredictability to a brush by setting your brush to jitter size and opacity at random.
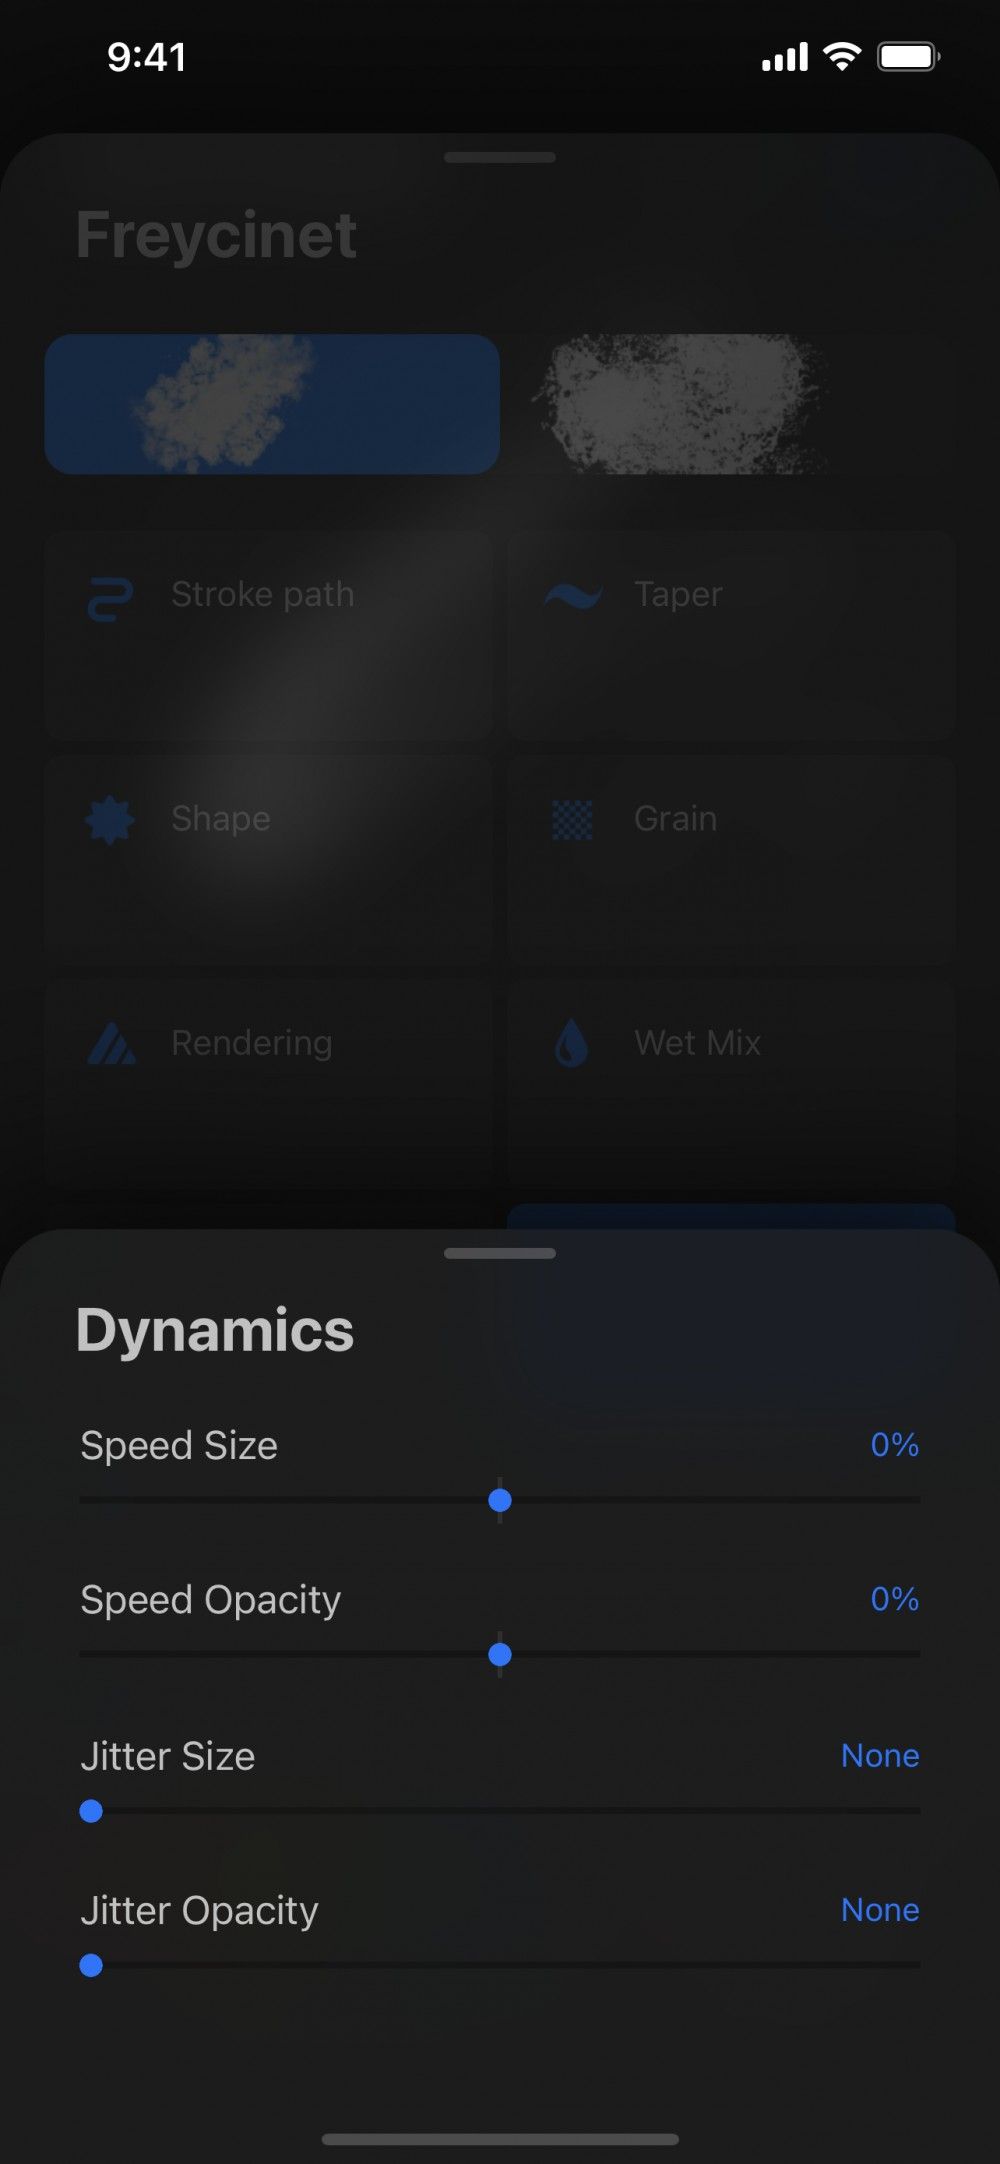
Use these attributes to create more dynamic brushstrokes when painting with a finger.
Speed
Use the speed of your stroke to determine its appearance.
Size
Use the speed of your stroke to vary its size. When the Size slider is set to -100%, drawing slowly will produce a thinner stroke. Shifting the slider to +100% will reverse this, making thinner strokes the faster you draw. With the slider set to 0%, the stroke will remain a uniform thickness.
Opacity
Use the speed of your stroke to vary its opacity. When the Opacity slider is set to -100%, drawing slowly will reduce the Opacity of the stroke. Shifting the slider to +100% will reverse this, reducing the Opacity of a stroke the faster you draw. With the slider set to 0%, the stroke will remain a uniform 100% opacity.
Jitter
Dynamically alter the appearance of the shape stamp throughout your stroke.
This setting is random, and not affected by speed.
Size
Alter the size of the shape stamp at random throughout your stroke.
Opacity
Alter the opacity of the shape stamp at random throughout your stroke.
Attribute: Pressure
Make fine adjustments to how the Pressure slider interacts with your brush. Set pressure to affect fundamental behaviors of your brush. Affect behaviors such as size, opacity, flow, bleed, smoothing and more.
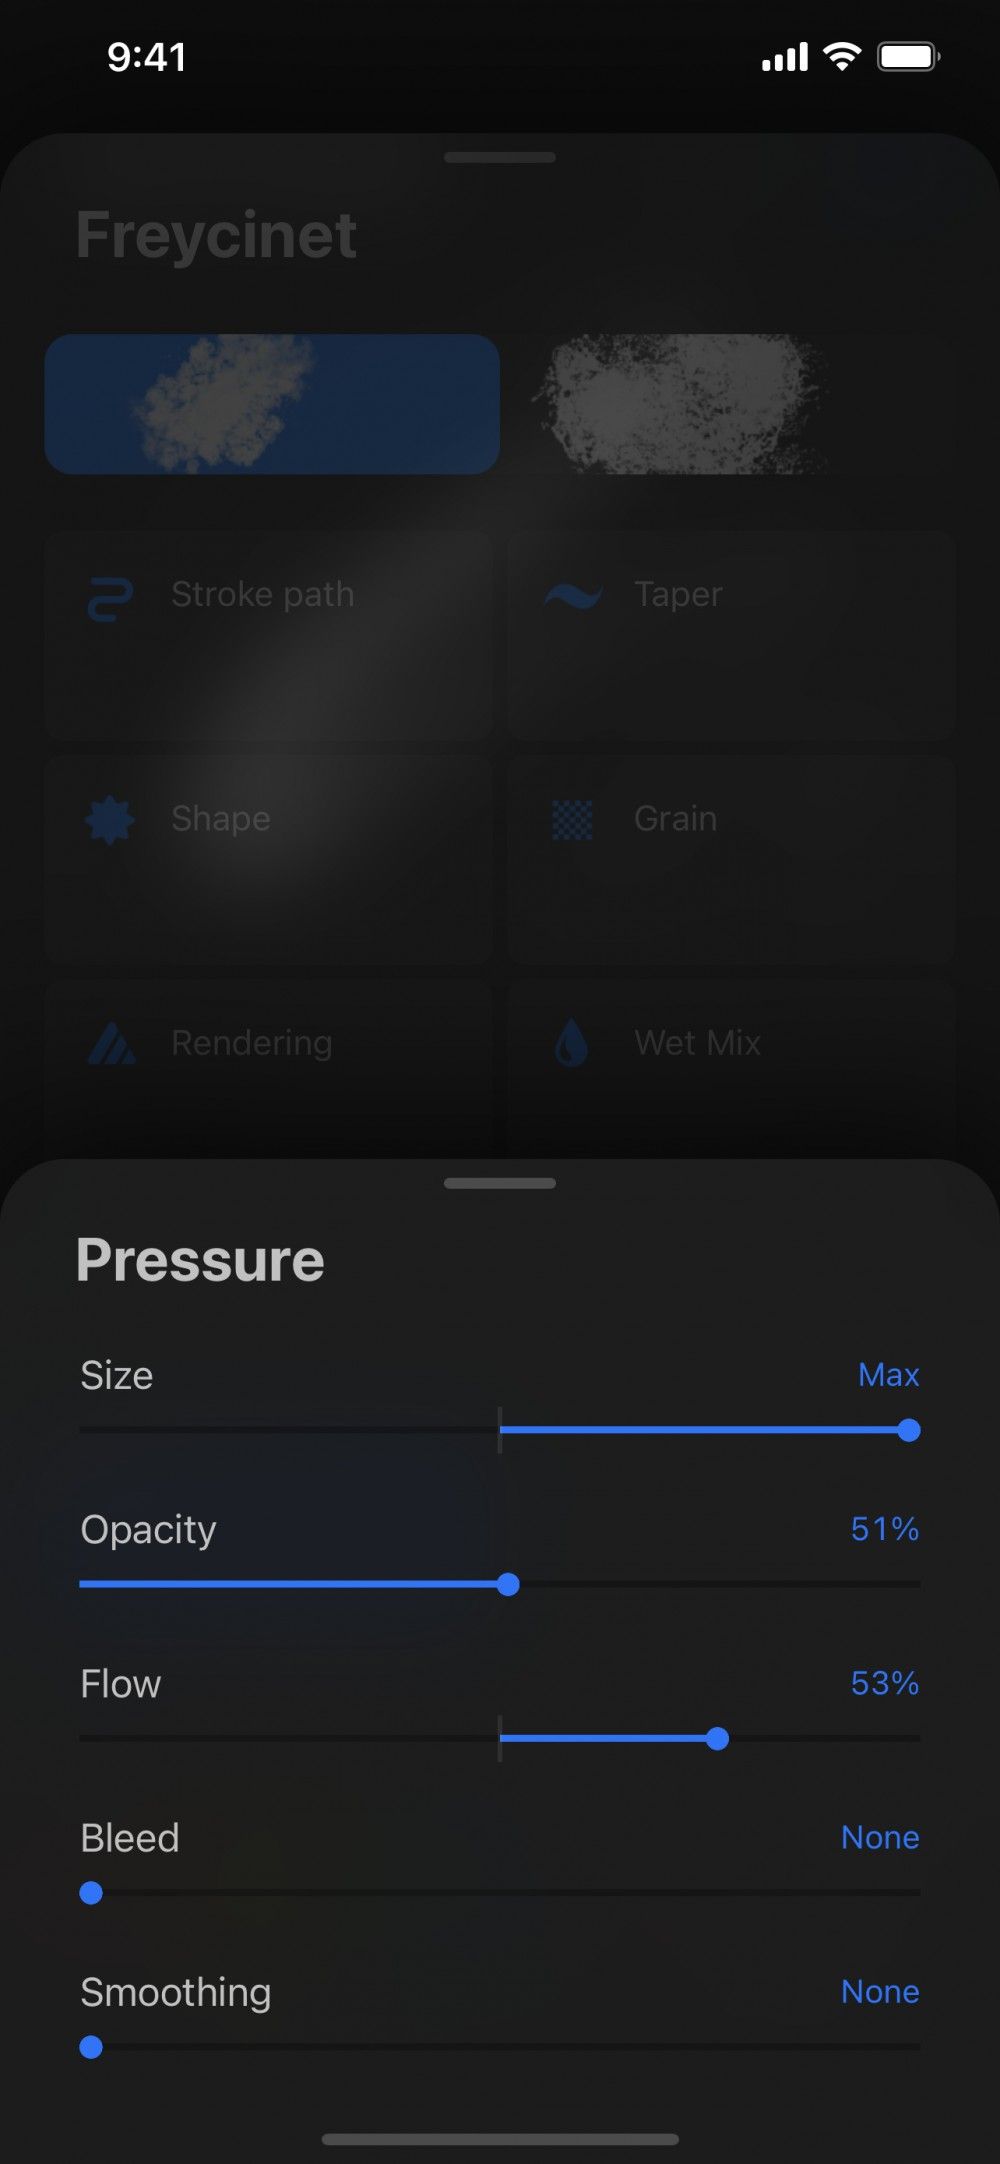
Pressure
These settings have a trickle-down effect on all other pressure-based adjustments.
Size, Opacity, Flow, Bleed and Smoothing can have their percentage amounts adjusted using sliders.
Size
Adjust how large or small the tip of your brush becomes under varying pressure.
Opacity
Adjust the transparent-to-opaque range of your brush under varying pressure
Flow
Adjust how much paint your brush lays down under varying pressure.
Bleed
Adjust how much your brush bleeds around the edges into the canvas under varying pressure.
Smoothing
Adjust how smooth the brush transition is from low to high pressure. This is like StreamLine for pressure. Set the slider high and pressure transitions will be very smooth. Set the slider to zero and the brush will express every bit of pressure data.
Attribute: Properties
Establish miscellaneous settings that establish how the brush looks in preview form in the Brush Library. This also sets how it behaves within the Procreate Pocket interface.
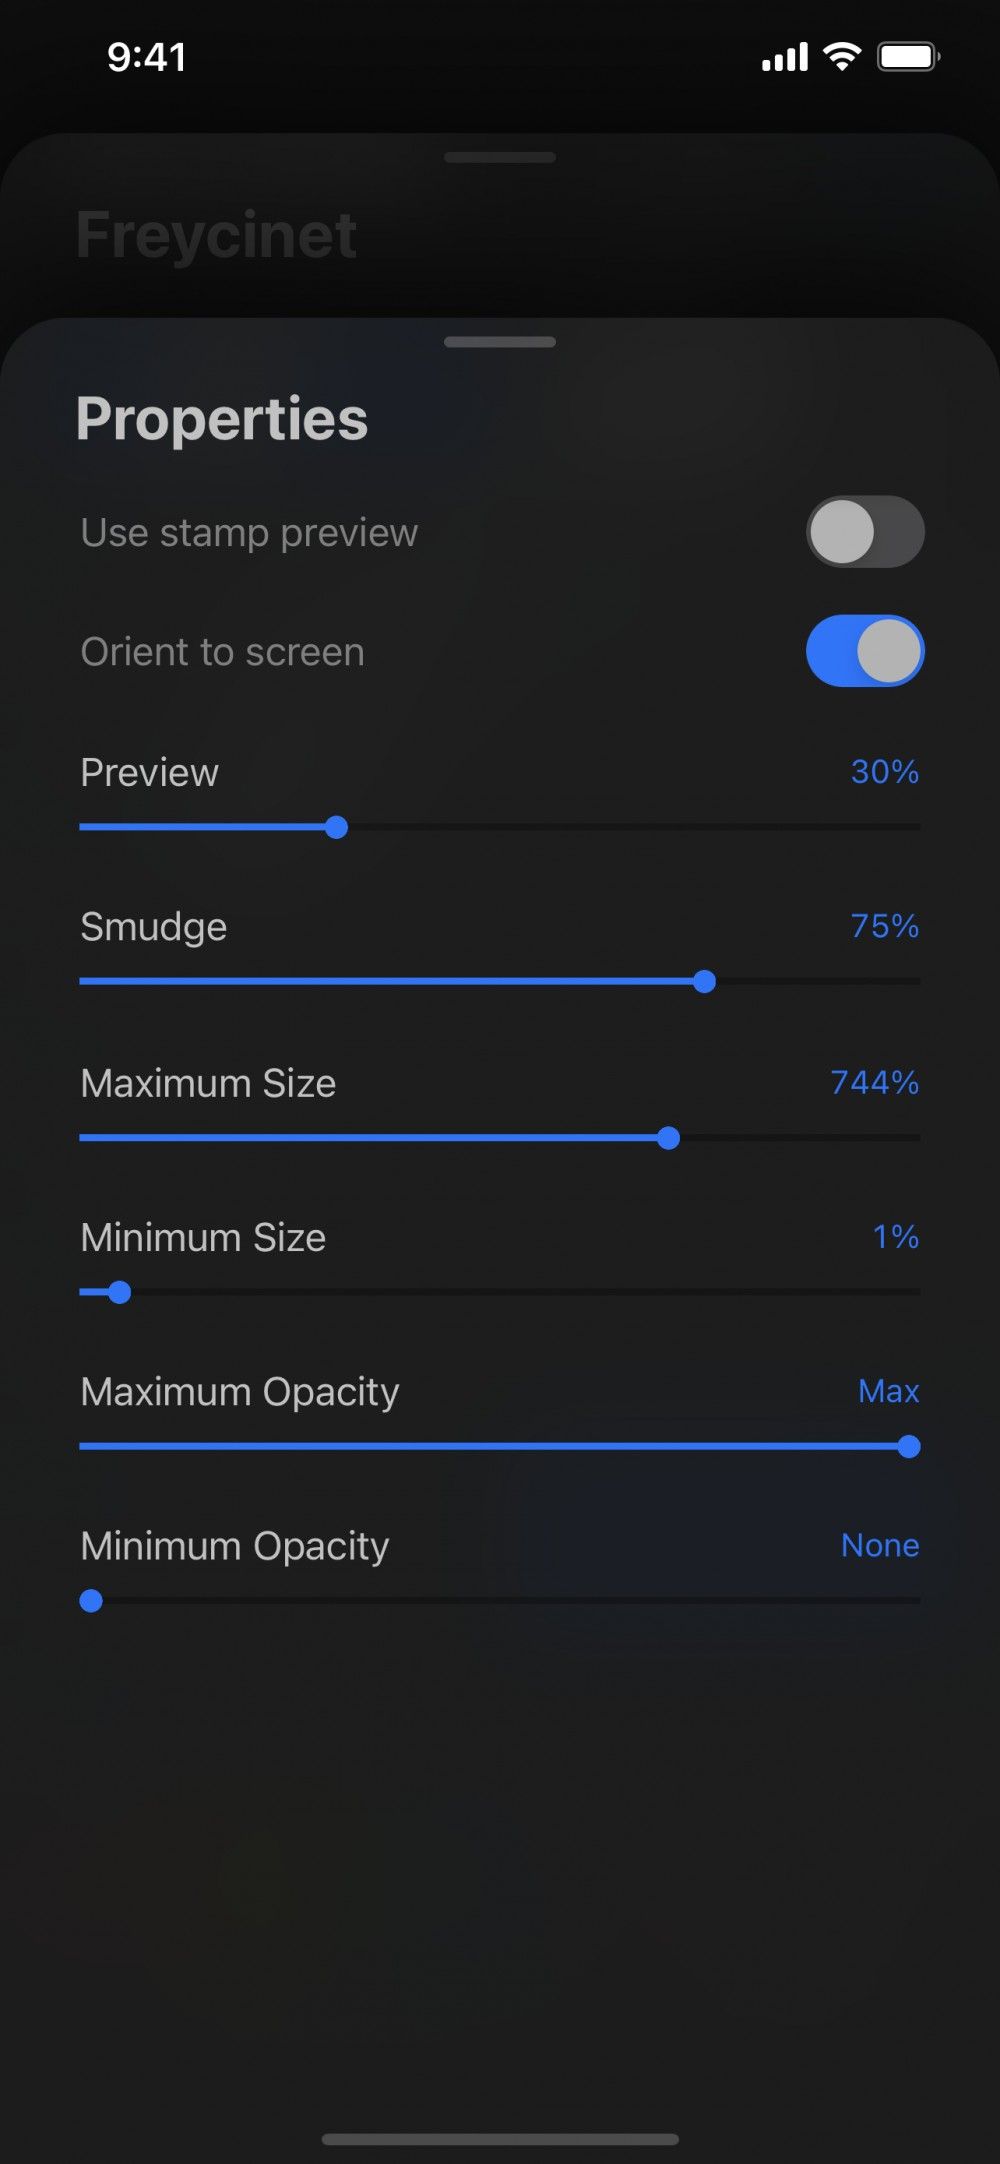
Brush Properties
Change the way your brush preview displays in the Library, how the brush orients to your screen rotation, and set a default Smudge strength.
Use Stamp Preview
The preview of each brush in the Brush Library is usually expressed as a stroke. Toggle this switch to express the preview as a shape stamp instead.
Orient to Screen
This setting only applies when a brush has a distinct ‘up’ and ‘down’ to its stroke. Toggle off to make the shape orientation consistent for the document. This applies no matter how the device rotates. Toggle on to make the shape orientation consistent for the current device orientation.
Preview
Set the size of the stroke or shape stamp in the preview of this brush appears in the Brush Library.
Smudge
Adjust how much a brush smudges when set as the Smudge tool.
Brush Behavior
Set size and opacity boundaries on your brush. These settings control the upper and lower limits of the size and pressure sliders in the Procreate Pocket brush sliders .
Maximum / Minimum Size
Set an upper and/or lower size limit on the size slider.
Maximum / Minimum Pressure
Set an upper and/or lower pressure limit on the pressure slider.
Attribute: About this Brush
Sign your name to your custom brushes and add a profile photo. This way your work will always be credited to you. Reset brushes back to defaults. Or create new ‘reset points’. This allows you to experiment on a brush without losing your favorite settings.

You can now sign any brush you create with your name, photo, and handwritten signature. This information embeds in your .brush file. Anyone else who opens your brush in Procreate Pocket will see your credit when they look at About this Brush.
Profile Picture
Tap the ‘person’ icon to bring up Image Source options. From Camera allows you to snap a photo of yourself using the iPad camera. Or, choose From Photos to load a pre-existing image from your camera roll.
Made by Name
Tap the greyed-out word Name in Made by Name to bring up the keyboard and add your name to your creation.
Date Created
A creation date and time for your brush. This information is automatically filled in for you.
Signature
Sign your name on the dotted line using your finger. If you need to start again, tap the (x) icon to clear the field.
Create New Reset Point
When you are happy with your brush design, but want to keep experimenting, save a Reset Point. You can revert back to it later if you don’t like your changes.
Reset brush
On a core brush, Reset strips away all your changes and return the brush to the default Procreate Pocket version. You must duplicate a default brush if you want to give it a new reset point. On your own original brushes you can change the reset point as often as you like.
Sorry. We’re having trouble copying to your clipboard.
Try directly copying the link below.
Still have questions?
If you didn't find what you're looking for, explore our video resources on YouTube or contact us directly. We’re always happy to help.